end0tknr's kipple - web写経開発

太宰府天満宮の狛犬って、妙にカワイイ

2層ニューラルネットワークに対する誤差 逆伝播法 - python

先日のエントリの続きであり、o'reilly「ゼロから作る Deep Learning」5章の写経.

end0tknr.hateblo.jp

github.com

誤差 逆伝播法 による 2層ニューラルネットワーク モデル

pythonコードだけでは分かりづらいので、図示してみました

f:id:end0tknr:20171123173523p:plain

ニューラルネットワークに対する誤差 逆伝播法 - python

#!/usr/local/python3/bin/python3
# coding: utf-8

try:
    import urllib.request
except ImportError:
    raise ImportError('You should use Python 3.x')
import os.path
import gzip
import pickle
import sys, os
sys.path.append(os.pardir)  # 親dirのfileをimportする為
import numpy as np
from collections import OrderedDict
import matplotlib.pyplot as plt


## https://github.com/oreilly-japan/deep-learning-from-scratch/tree/master/ch05

MNIST_DATASET_DIR = os.path.dirname(os.path.abspath(__file__))
MNIST_SAVE_FILE = MNIST_DATASET_DIR + "/mnist.pkl"
MNIST_URL_BASE = 'http://yann.lecun.com/exdb/mnist/'
MNIST_GZ_FILES = {
    'train_img':'train-images-idx3-ubyte.gz',
    'train_label':'train-labels-idx1-ubyte.gz',
    'test_img':'t10k-images-idx3-ubyte.gz',
    'test_label':'t10k-labels-idx1-ubyte.gz'
}
MNIST_IMG_SIZE = 784

######################################################

def main():
    # mnist読込み. 初回は yann.lecun.com よりdownload
    # x_train:教師 data(画像), t_train:教師 data(label)
    # x_test :test data(画像), t_test :test data(label)
    (x_train, t_train), (x_test, t_test) = \
      load_mnist(normalize=True, one_hot_label=True)


    # 784=28*28 , 10=0~9
    network = TwoLayerNet(input_size=784, hidden_size=50, output_size=10)

    iters_num = 10000  # 繰返し回数
    train_size = x_train.shape[0]
    batch_size = 100
    learning_rate = 0.1

    train_loss_list = []
    train_acc_list = []
    test_acc_list = []


    iter_per_epoch = max(train_size / batch_size, 1)


    for i in range(iters_num):
        batch_mask = np.random.choice(train_size, batch_size)
        x_batch = x_train[batch_mask]
        t_batch = t_train[batch_mask]

        # 勾配算出
        grad = network.gradient(x_batch, t_batch)

        # 更新
        for key in ('W1', 'b1', 'W2', 'b2'):
            network.params[key] -= learning_rate * grad[key]

        loss = network.loss(x_batch, t_batch)
        train_loss_list.append(loss)

        if i % iter_per_epoch == 0:
            train_acc = network.accuracy(x_train, t_train)
            test_acc = network.accuracy(x_test, t_test)
            train_acc_list.append(train_acc)
            test_acc_list.append(test_acc)

            print("W1:", network.params['W1'])
            print("b1:", network.params['b1'])
            print("W2:", network.params['W2'])
            print("b2:", network.params['b2'])

            print("ACCURACY OF TRAIN/TEST:", train_acc, "/", test_acc)


    # グラフの描画
    markers = {'train': 'o', 'test': 's'}
    x = np.arange(len(train_acc_list))
    plt.plot(x, train_acc_list, label='train acc')
    plt.plot(x, test_acc_list, label='test acc', linestyle='--')
    plt.xlabel("epochs")
    plt.ylabel("accuracy")
    plt.ylim(0, 1.0)
    plt.legend(loc='lower right')
    plt.savefig( 'train_neuralnet.png' )


######################################################

class TwoLayerNet:

    def __init__(self, input_size, hidden_size, output_size, weight_init_std = 0.01):
        # 重みの初期化
        self.params = {}
        self.params['W1'] = weight_init_std * np.random.randn(input_size, hidden_size)
        self.params['b1'] = np.zeros(hidden_size)
        self.params['W2'] = weight_init_std * np.random.randn(hidden_size, output_size) 
        self.params['b2'] = np.zeros(output_size)

        # レイヤの生成
        self.layers = OrderedDict()
        self.layers['Affine1'] = Affine(self.params['W1'], self.params['b1'])
        self.layers['Relu1'] = Relu()
        self.layers['Affine2'] = Affine(self.params['W2'], self.params['b2'])

        self.lastLayer = SoftmaxWithLoss()
        
    def predict(self, x):
        for layer in self.layers.values():
            x = layer.forward(x)
        
        return x
        
    # x:入力データ, t:教師データ
    def loss(self, x, t):
        y = self.predict(x)
        return self.lastLayer.forward(y, t)
    
    def accuracy(self, x, t):
        y = self.predict(x)
        y = np.argmax(y, axis=1)
        if t.ndim != 1 : t = np.argmax(t, axis=1)
        
        accuracy = np.sum(y == t) / float(x.shape[0])
        return accuracy
        
    def gradient(self, x, t):
        # forward
        self.loss(x, t)

        # backward
        dout = 1
        dout = self.lastLayer.backward(dout)
        
        layers = list(self.layers.values())
        layers.reverse()
        for layer in layers:
            dout = layer.backward(dout)

        # 設定
        grads = {}
        grads['W1'], grads['b1'] = self.layers['Affine1'].dW, self.layers['Affine1'].db
        grads['W2'], grads['b2'] = self.layers['Affine2'].dW, self.layers['Affine2'].db

        return grads

######################################################

class SoftmaxWithLoss:
    def __init__(self):
        self.loss = None
        self.y = None # softmaxの出力
        self.t = None # 教師データ

    def forward(self, x, t):
        self.t = t
        self.y = softmax(x)
        self.loss = cross_entropy_error(self.y, self.t)
        
        return self.loss

    def backward(self, dout=1):
        batch_size = self.t.shape[0]
        if self.t.size == self.y.size: # 教師データがone-hot-vectorの場合
            dx = (self.y - self.t) / batch_size
        else:
            dx = self.y.copy()
            dx[np.arange(batch_size), self.t] -= 1
            dx = dx / batch_size
        
        return dx

######################################################

class Affine:
    def __init__(self, W, b):
        self.W =W
        self.b = b
        
        self.x = None
        self.original_x_shape = None
        # 重み・バイアスパラメータの微分
        self.dW = None
        self.db = None

    def forward(self, x):
        # テンソル対応
        self.original_x_shape = x.shape
        x = x.reshape(x.shape[0], -1)
        self.x = x

        out = np.dot(self.x, self.W) + self.b

        return out

    def backward(self, dout):
        dx = np.dot(dout, self.W.T)
        self.dW = np.dot(self.x.T, dout)
        self.db = np.sum(dout, axis=0)
        
        dx = dx.reshape(*self.original_x_shape)  # 入力データの形状に戻す(テンソル対応)
        return dx


######################################################

class Relu:
    def __init__(self):
        self.mask = None

    def forward(self, x):
        self.mask = (x <= 0)
        out = x.copy()
        out[self.mask] = 0

        return out

    def backward(self, dout):
        dout[self.mask] = 0
        dx = dout

        return dx


######################################################

def softmax(x):
    if x.ndim == 2:
        x = x.T
        x = x - np.max(x, axis=0)
        y = np.exp(x) / np.sum(np.exp(x), axis=0)
        return y.T 

    x = x - np.max(x) # オーバーフロー対策
    return np.exp(x) / np.sum(np.exp(x))


def cross_entropy_error(y, t):
    if y.ndim == 1:
        t = t.reshape(1, t.size)
        y = y.reshape(1, y.size)
        
    # 教師データがone-hot-vectorの場合、正解ラベルのインデックスに変換
    if t.size == y.size:
        t = t.argmax(axis=1)
             
    batch_size = y.shape[0]
    return -np.sum(np.log(y[np.arange(batch_size), t])) / batch_size


######################################################

def load_mnist(normalize=True, flatten=True, one_hot_label=False):
    """MNISTの読み込み
    params
      normalize : 画像のピクセル値を0.0~1.0に正規化
      one_hot_label :
        one_hot_labelがTrueの場合、ラベルはone-hot配列として返す
      flatten : 画像を一次元配列に平にするかどうか
    
    returns
      (訓練画像, 訓練ラベル), (テスト画像, テストラベル)
    """
    if not os.path.exists(MNIST_SAVE_FILE):
        init_mnist()
        
    with open(MNIST_SAVE_FILE, 'rb') as f:
        dataset = pickle.load(f)
    
    if normalize:
        for key in ('train_img', 'test_img'):
            dataset[key] = dataset[key].astype(np.float32)
            dataset[key] /= 255.0
            
    if one_hot_label:
        dataset['train_label'] = _change_one_hot_label(dataset['train_label'])
        dataset['test_label'] =  _change_one_hot_label(dataset['test_label'])
    
    if not flatten:
         for key in ('train_img', 'test_img'):
            dataset[key] = dataset[key].reshape(-1, 1, 28, 28)

    return (dataset['train_img'], dataset['train_label']), \
           (dataset['test_img'], dataset['test_label'])


def init_mnist():
    download_mnist()

    dataset = {}
    dataset['train_img'] =   load_mnist_img(  MNIST_GZ_FILES['train_img'])
    dataset['test_img'] =    load_mnist_img(  MNIST_GZ_FILES['test_img'])
    dataset['train_label'] = load_mnist_label(MNIST_GZ_FILES['train_label'])
    dataset['test_label'] =  load_mnist_label(MNIST_GZ_FILES['test_label'])

    with open(MNIST_SAVE_FILE, 'wb') as f:
        pickle.dump(dataset, f, -1)


def download_mnist():
    
    for file_name in MNIST_GZ_FILES.values():
        file_path = MNIST_DATASET_DIR + "/" + file_name

        if os.path.exists(file_path):
            continue
        print("download",
              MNIST_URL_BASE + file_name,
              "to", MNIST_DATASET_DIR)
        
        urllib.request.urlretrieve(MNIST_URL_BASE + file_name, file_path)


def load_mnist_label(file_name):
    file_path = MNIST_DATASET_DIR + "/" + file_name

    # rb = バイナリの読込み
    with gzip.open(file_path, 'rb') as f:
        labels = np.frombuffer(f.read(), np.uint8, offset=8)
        # 上記の「offset」の必要性は理解していません
    return labels

def load_mnist_img(file_name):
    file_path = MNIST_DATASET_DIR + "/" + file_name
    
    # rb = バイナリの読込み
    with gzip.open(file_path, 'rb') as f:
        data = np.frombuffer(f.read(), np.uint8, offset=16)
        # 上記の「offset」の必要性は理解していません

    # numpy.reshape(-1, ...)で、一次元配列化
    data = data.reshape(-1, MNIST_IMG_SIZE)
    return data


def _change_one_hot_label(X):
    T = np.zeros((X.size, 10))
    for idx, row in enumerate(T):
        row[X[idx]] = 1
        
    return T


if __name__ == '__main__':
    main()

↑こう書くと↓こう表示されます

f:id:end0tknr:20171123152329p:plain

2層ニューラルネットワークに対する確率的勾配降下法 - python

github.com

またも、 o'reilly「ゼロから作る Deep Learning」4章にある勾配降下法の写経.

今回は、2層ニューラルネットワークに対して実行します。

mnist, ミニバッチ, 数値微分, 勾配降下, 損失関数 等、 ディープラーニングに関する基本が揃っています。

まだまだ、全くゼロから、自分でsrc書けませんが

#!/usr/local/python3/bin/python3
# coding: utf-8

try:
    import urllib.request
except ImportError:
    raise ImportError('You should use Python 3.x')
import os.path
import gzip
import pickle
import sys, os
sys.path.append(os.pardir)  # 親dirのfileをimportする為
import numpy as np
import matplotlib.pyplot as plt
#from dataset.mnist import load_mnist
#from two_layer_net import TwoLayerNet

## https://github.com/oreilly-japan/deep-learning-from-scratch/tree/master/ch04

MNIST_DATASET_DIR = os.path.dirname(os.path.abspath(__file__))
MNIST_SAVE_FILE = MNIST_DATASET_DIR + "/mnist.pkl"
MNIST_URL_BASE = 'http://yann.lecun.com/exdb/mnist/'
MNIST_GZ_FILES = {
    'train_img':'train-images-idx3-ubyte.gz',
    'train_label':'train-labels-idx1-ubyte.gz',
    'test_img':'t10k-images-idx3-ubyte.gz',
    'test_label':'t10k-labels-idx1-ubyte.gz'
}
MNIST_IMG_SIZE = 784


def main():
    # mnist読込み. 初回は yann.lecun.com よりdownload
    # x_train:教師 data(画像), t_train:教師 data(label)
    # x_test :test data(画像), t_test :test data(label)
    (x_train, t_train), (x_test, t_test) = \
      load_mnist(normalize=True, one_hot_label=True)

    # 784=28*28 , 10=0~9
    network = TwoLayerNet(input_size=784, hidden_size=50, output_size=10)

    iters_num = 10000  # 繰返し回数
    train_size = x_train.shape[0]
    batch_size = 100
    learning_rate = 0.1

    train_loss_list = []
    train_acc_list = []
    test_acc_list = []

    iter_per_epoch = max(train_size / batch_size, 1)

    for i in range(iters_num):
        batch_mask = np.random.choice(train_size, batch_size)
        x_batch = x_train[batch_mask]
        t_batch = t_train[batch_mask]

        # 勾配の計算
        #grad = network.numerical_gradient(x_batch, t_batch)
        grad = network.gradient(x_batch, t_batch)

        # パラメータの更新
        for key in ('W1', 'b1', 'W2', 'b2'):
            network.params[key] -= learning_rate * grad[key]

        loss = network.loss(x_batch, t_batch)
        train_loss_list.append(loss)

        if i % iter_per_epoch == 0:
            train_acc = network.accuracy(x_train, t_train)
            test_acc = network.accuracy(x_test, t_test)
            train_acc_list.append(train_acc)
            test_acc_list.append(test_acc)
            print("train acc, test acc | " + str(train_acc) + ", " + str(test_acc))


    # グラフの描画
    markers = {'train': 'o', 'test': 's'}
    x = np.arange(len(train_acc_list))
    plt.plot(x, train_acc_list, label='train acc')
    plt.plot(x, test_acc_list, label='test acc', linestyle='--')
    plt.xlabel("epochs")
    plt.ylabel("accuracy")
    plt.ylim(0, 1.0)
    plt.legend(loc='lower right')
    plt.savefig( 'train_neuralnet.png' )


def load_mnist(normalize=True, flatten=True, one_hot_label=False):
    """MNISTの読み込み
    params
      normalize : 画像のピクセル値を0.0~1.0に正規化
      one_hot_label :
        one_hot_labelがTrueの場合、ラベルはone-hot配列として返す
      flatten : 画像を一次元配列に平にするかどうか
    
    returns
      (訓練画像, 訓練ラベル), (テスト画像, テストラベル)
    """
    if not os.path.exists(MNIST_SAVE_FILE):
        init_mnist()
        
    with open(MNIST_SAVE_FILE, 'rb') as f:
        dataset = pickle.load(f)
    
    if normalize:
        for key in ('train_img', 'test_img'):
            dataset[key] = dataset[key].astype(np.float32)
            dataset[key] /= 255.0
            
    if one_hot_label:
        dataset['train_label'] = _change_one_hot_label(dataset['train_label'])
        dataset['test_label'] =  _change_one_hot_label(dataset['test_label'])
    
    if not flatten:
         for key in ('train_img', 'test_img'):
            dataset[key] = dataset[key].reshape(-1, 1, 28, 28)

    return (dataset['train_img'], dataset['train_label']), \
           (dataset['test_img'], dataset['test_label'])


def init_mnist():
    download_mnist()

    dataset = {}
    dataset['train_img'] =   load_mnist_img(  MNIST_GZ_FILES['train_img'])
    dataset['test_img'] =    load_mnist_img(  MNIST_GZ_FILES['test_img'])
    dataset['train_label'] = load_mnist_label(MNIST_GZ_FILES['train_label'])
    dataset['test_label'] =  load_mnist_label(MNIST_GZ_FILES['test_label'])

    with open(MNIST_SAVE_FILE, 'wb') as f:
        pickle.dump(dataset, f, -1)


def download_mnist():
    
    for file_name in MNIST_GZ_FILES.values():
        file_path = MNIST_DATASET_DIR + "/" + file_name

        if os.path.exists(file_path):
            continue
        print("download",
              MNIST_URL_BASE + file_name,
              "to", MNIST_DATASET_DIR)
        
        urllib.request.urlretrieve(MNIST_URL_BASE + file_name, file_path)


def load_mnist_label(file_name):
    file_path = MNIST_DATASET_DIR + "/" + file_name

    # rb = バイナリの読込み
    with gzip.open(file_path, 'rb') as f:
        labels = np.frombuffer(f.read(), np.uint8, offset=8)
        # 上記の「offset」の必要性は理解していません
    return labels

def load_mnist_img(file_name):
    file_path = MNIST_DATASET_DIR + "/" + file_name
    
    # rb = バイナリの読込み
    with gzip.open(file_path, 'rb') as f:
        data = np.frombuffer(f.read(), np.uint8, offset=16)
        # 上記の「offset」の必要性は理解していません

    # numpy.reshape(-1, ...)で、一次元配列化
    data = data.reshape(-1, MNIST_IMG_SIZE)
    return data


def _change_one_hot_label(X):
    T = np.zeros((X.size, 10))
    for idx, row in enumerate(T):
        row[X[idx]] = 1
        
    return T


class TwoLayerNet:

    def __init__(self, input_size, hidden_size, output_size, weight_init_std=0.01):
        # 重みの初期化
        self.params = {}
        self.params['W1'] = weight_init_std * np.random.randn(input_size, hidden_size)
        self.params['b1'] = np.zeros(hidden_size)
        self.params['W2'] = weight_init_std * np.random.randn(hidden_size, output_size)
        self.params['b2'] = np.zeros(output_size)

    def predict(self, x):
        W1, W2 = self.params['W1'], self.params['W2']
        b1, b2 = self.params['b1'], self.params['b2']
    
        a1 = np.dot(x, W1) + b1
        z1 = sigmoid(a1)
        a2 = np.dot(z1, W2) + b2
        y = softmax(a2)
        
        return y
        
    # x:入力データ, t:教師データ
    def loss(self, x, t):
        y = self.predict(x)
        
        return cross_entropy_error(y, t)
    
    def accuracy(self, x, t):
        y = self.predict(x)
        y = np.argmax(y, axis=1)
        t = np.argmax(t, axis=1)
        
        accuracy = np.sum(y == t) / float(x.shape[0])
        return accuracy
        
    # x:入力データ, t:教師データ
    def numerical_gradient(self, x, t):
        loss_W = lambda W: self.loss(x, t)
        
        grads = {}
        grads['W1'] = numerical_gradient(loss_W, self.params['W1'])
        grads['b1'] = numerical_gradient(loss_W, self.params['b1'])
        grads['W2'] = numerical_gradient(loss_W, self.params['W2'])
        grads['b2'] = numerical_gradient(loss_W, self.params['b2'])
        
        return grads
        
    def gradient(self, x, t):
        W1, W2 = self.params['W1'], self.params['W2']
        b1, b2 = self.params['b1'], self.params['b2']
        grads = {}
        
        batch_num = x.shape[0]
        
        # forward
        a1 = np.dot(x, W1) + b1
        z1 = sigmoid(a1)
        a2 = np.dot(z1, W2) + b2
        y = softmax(a2)
        
        # backward
        dy = (y - t) / batch_num
        grads['W2'] = np.dot(z1.T, dy)
        grads['b2'] = np.sum(dy, axis=0)
        
        da1 = np.dot(dy, W2.T)
        dz1 = sigmoid_grad(a1) * da1
        grads['W1'] = np.dot(x.T, dz1)
        grads['b1'] = np.sum(dz1, axis=0)

        return grads


def numerical_gradient(f, x):
    h = 1e-4 # 0.0001
    grad = np.zeros_like(x)
    
    it = np.nditer(x, flags=['multi_index'], op_flags=['readwrite'])
    while not it.finished:
        idx = it.multi_index
        tmp_val = x[idx]
        x[idx] = float(tmp_val) + h
        fxh1 = f(x) # f(x+h)
        
        x[idx] = tmp_val - h 
        fxh2 = f(x) # f(x-h)
        grad[idx] = (fxh1 - fxh2) / (2*h)
        
        x[idx] = tmp_val # 値を元に戻す
        it.iternext()   
        
    return grad


def sigmoid(x):
    return 1 / (1 + np.exp(-x))    


def sigmoid_grad(x):
    return (1.0 - sigmoid(x)) * sigmoid(x)
    

def relu(x):
    return np.maximum(0, x)


def relu_grad(x):
    grad = np.zeros(x)
    grad[x>=0] = 1
    return grad
    

def softmax(x):
    if x.ndim == 2:
        x = x.T
        x = x - np.max(x, axis=0)
        y = np.exp(x) / np.sum(np.exp(x), axis=0)
        return y.T 

    x = x - np.max(x) # オーバーフロー対策
    return np.exp(x) / np.sum(np.exp(x))


def cross_entropy_error(y, t):
    if y.ndim == 1:
        t = t.reshape(1, t.size)
        y = y.reshape(1, y.size)
        
    # 教師データがone-hot-vectorの場合、正解ラベルのインデックスに変換
    if t.size == y.size:
        t = t.argmax(axis=1)
             
    batch_size = y.shape[0]
    return -np.sum(np.log(y[np.arange(batch_size), t])) / batch_size


def softmax_loss(X, t):
    y = softmax(X)
    return cross_entropy_error(y, t)


if __name__ == '__main__':
    main()

↑こう書くと↓こう表示されます

f:id:end0tknr:20171120221330p:plain

RFP / 要求仕様書 のサンプル

って、過去に探した範囲では、厚生労働省の「調達情報一覧」が 豊富で、具体的かと思います。

www.mhlw.go.jp

日本年金機構 間接業務システム 運用保守業務一式調達仕様書(案) http://www.mhlw.go.jp/sinsei/chotatu/chotatu/shiyousho-an/dl/090422-1a.pdf

例えば、上記urlのpdf p.48は、ITILのインシデント管理/問題管理の参考になります

勾配降下法による最小値算出 by python

先程のエントリの続きで、 o'reilly「ゼロから作る Deep Learning」4章にある勾配降下法を写経.

github.com

ざっくり、勾配降下法とは

ニュートン法...?」のような印象です。

{ \Large {
x_0 = x_0 - η \frac {d f(x)}{dx_0}
x_1 = x_1 - η \frac {d f(x)}{dx_1}
} }

上記のように、x0, x1 を上書きしながら、近似値解を求めます。

η(エータ)は学習率(learnig rate)で、 - 大きすぎると、発散し - 小さすぎると、解に近づきません

二次式に対する勾配降下

{ \Large
f(x_0, x_1) = {x_0}^2 + {x_1}^2
}

以下のscriptは上記二次式に対する勾配降下です。

#!/usr/local/bin/python
# coding: utf-8

import numpy as np

import matplotlib
matplotlib.use('Agg')
import matplotlib.pylab as plt


def main():
    init_x = np.array([-3.0, 4.0])

    lr = 0.1
    step_num = 20
    # 勾配降下
    x, x_history = gradient_descent(function_2,
                                    init_x,
                                    lr=lr,  # 学習率
                                    step_num=step_num)

    plt.plot( [-5, 5], [0,0], '--b')
    plt.plot( [0,0], [-5, 5], '--b')
    plt.plot(x_history[:,0], x_history[:,1], 'o')

    plt.xlim(-3.5, 3.5)
    plt.ylim(-4.5, 4.5)
    plt.xlabel("X0")
    plt.ylabel("X1")
    plt.savefig( 'gradient_method.png' )


# 勾配降下
def gradient_descent(f, init_x, lr=0.01, step_num=100):
    x = init_x
    x_history = []

    for i in range(step_num):
        x_history.append( x.copy() )

        grad = numerical_gradient(f, x)
        x -= lr * grad

    return x, np.array(x_history)


# 数値微分
def numerical_gradient(f, X):
    if X.ndim == 1:             # ndim: 次元数
        return _numerical_gradient_no_batch(f, X)
    else:
        grad = np.zeros_like(X) # X と同じ形状の「0 配列」作成
        
        for idx, x in enumerate(X):
            grad[idx] = _numerical_gradient_no_batch(f, x)
        
        return grad


# 数値微分(詳細?) ...  dy/dx = lim(h->0) { f(x+h) - f(x-h)} / 2h }
def _numerical_gradient_no_batch(f, x):
    h = 1e-4 # 0.0001
    grad = np.zeros_like(x)   # X と同じ形状の「0 配列」作成
  
    for idx in range(x.size):
        tmp_val = x[idx]
        x[idx] = float(tmp_val) + h
        fxh1 = f(x) # f(x+h)
        
        x[idx] = tmp_val - h
        fxh2 = f(x) # f(x-h)
        grad[idx] = (fxh1 - fxh2) / (2*h)
        
        x[idx] = tmp_val # 値を元に戻す
        
    return grad

def function_2(x):
    return x[0]**2 + x[1]**2


if __name__ == '__main__':
    main()

↑こう書くと、↓こう表示されます

f:id:end0tknr:20171119094713p:plain

ニューラルネットワークに対する勾配降下

{ \Large
重み:
W = \left(
 \begin{array}{ccc}
    w_{11} & w_{21} & w_{31} \\\
    w_{12} & w_{22} & w_{32}
 \end{array} \right)
}
{ \Large
損失関数:
\frac {\partial L}{\partial W} = 
\left( \begin{array}{ccc}
  \frac {\partial L}{\partial w_{11}} &
  \frac {\partial L}{\partial w_{21}} &
  \frac {\partial L}{\partial w_{31}} \\\
  \frac {\partial L}{\partial w_{12}} &
  \frac {\partial L}{\partial w_{22}} &
  \frac {\partial L}{\partial w_{32}}
 \end{array} \right)
}

以下は、上記の重みと、損失関数を持つニューラルネットワークに対する勾配降下。

#!/usr/local/bin/python
# coding: utf-8
import numpy as np


def main():
    x = np.array([0.6, 0.9])
    t = np.array([0, 0, 1])

    net = simpleNet()
    
    f = lambda w: net.loss(x, t)
    dW = numerical_gradient(f, net.W)

    print(dW)


class simpleNet:
    def __init__(self):
        # 正規分布(ガウシアン)乱数な 2x3行列作成
        self.W = np.random.randn(2,3)

    # 予測
    def predict(self, x):
        return np.dot(x, self.W) # 内積

    # 損失関数
    def loss(self, x, t):
        z = self.predict(x)
        y = softmax(z)
        loss = cross_entropy_error(y, t)

        return loss

# ソフトマックス
def softmax(x):
    if x.ndim == 2:
        x = x.T
        x = x - np.max(x, axis=0)
        y = np.exp(x) / np.sum(np.exp(x), axis=0)
        return y.T 

    x = x - np.max(x) # オーバーフロー対策
    return np.exp(x) / np.sum(np.exp(x))


# 交差エントロピー誤差
def cross_entropy_error(y, t):
    if y.ndim == 1:
        t = t.reshape(1, t.size)
        y = y.reshape(1, y.size)
        
    # 教師データがone-hot-vectorの場合、正解ラベルのインデックスに変換
    if t.size == y.size:
        t = t.argmax(axis=1)
             
    batch_size = y.shape[0]
    return -np.sum(np.log(y[np.arange(batch_size), t])) / batch_size

# 数値微分
def numerical_gradient(f, x):
    h = 1e-4 # 0.0001
    grad = np.zeros_like(x)  # 同じ形状の「0 配列」作成

    # numpy.nditer()により、次元数が増えても loopのnestが不要になります
    it = np.nditer(x, flags=['multi_index'], op_flags=['readwrite'])

    while not it.finished:
        idx = it.multi_index
        tmp_val = x[idx]
        x[idx] = float(tmp_val) + h
        fxh1 = f(x) # f(x+h)
        
        x[idx] = tmp_val - h
        fxh2 = f(x) # f(x-h)
        grad[idx] = (fxh1 - fxh2) / (2*h)
        
        x[idx] = tmp_val # 値を元に戻す
        it.iternext()
        
    return grad


if __name__ == '__main__':
    main()

↑こう書くと、↓こう表示されます

[[ 0.12770283  0.07875937 -0.2064622 ]
 [ 0.19155424  0.11813906 -0.3096933 ]]

pythonによる数値微分

勾配降下法に向け、o'reilly「ゼロから作る Deep Learning」の4章を写経.

github.com

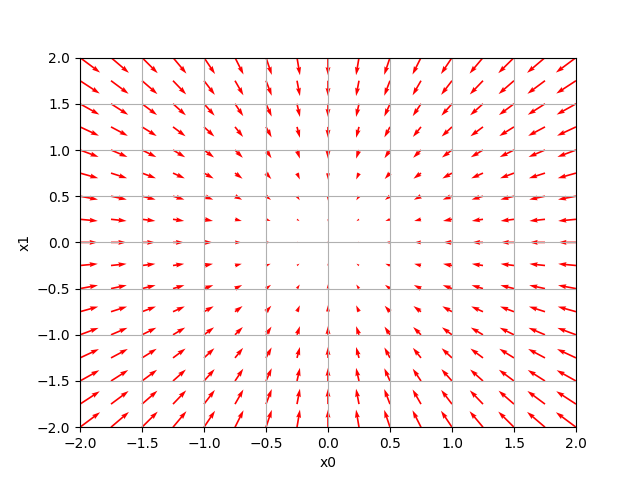
以下のscriptは

{ \Large
f(x_0, x_1) = {x_0}^2 + {x_1}^2
}

{ \Large {
\frac {d f(x)}{dx} = lim_{h→0} \frac {f(x+h) - f(x-h)} {2h}
} }

のように数値微分しています

#!/usr/local/bin/python
# -*- coding: utf-8 -*-

# https://github.com/oreilly-japan/deep-learning-from-scratch
# http://d.hatena.ne.jp/white_wheels/20100327/p3

import numpy as np
import matplotlib
matplotlib.use('Agg')
import matplotlib.pylab as plt

from mpl_toolkits.mplot3d import Axes3D


def main():
    # 等差数列の作成 (start, stop, step)
    x0 = np.arange(-2, 2.5, 0.25)
    x1 = np.arange(-2, 2.5, 0.25)
    # 格子座標の作成k
    X, Y = np.meshgrid(x0, x1)
    # 1次元化
    X = X.flatten()
    Y = Y.flatten()

    # 数値微分
    grad = numerical_gradient(function_2, np.array([X, Y]) )
    

    plt.figure()
    #ベクトルの描画
    plt.quiver(X, Y, -grad[0], -grad[1],  angles="xy",color="#ff0000")
    plt.xlim([-2, 2]) #表示範囲
    plt.ylim([-2, 2])
    plt.xlabel('x0')
    plt.ylabel('x1')
    plt.grid()
    plt.draw()
    plt.savefig( 'numerical_gradient.png' )


# 数値微分
def numerical_gradient(f, X):
    if X.ndim == 1:             # ndim: 次元数
        return _numerical_gradient_no_batch(f, X)
    else:
        grad = np.zeros_like(X) # X と同じ形状の「0 配列」作成
        
        for idx, x in enumerate(X):
            grad[idx] = _numerical_gradient_no_batch(f, x)
        
        return grad


# 数値微分(詳細?) ...  dy/dx = lim(h->0) { f(x+h) - f(x-h)} / 2h }
def _numerical_gradient_no_batch(f, x):
    h = 1e-4 # 0.0001
    grad = np.zeros_like(x)   # X と同じ形状の「0 配列」作成
  
    for idx in range(x.size):
        tmp_val = x[idx]
        x[idx] = float(tmp_val) + h
        fxh1 = f(x) # f(x+h)
        
        x[idx] = tmp_val - h
        fxh2 = f(x) # f(x-h)
        grad[idx] = (fxh1 - fxh2) / (2*h)
        
        x[idx] = tmp_val # 値を元に戻す
        
    return grad


def function_2(x):
    if x.ndim == 1:   # ndim: 次元数
        return np.sum(x**2)
    else:
        # numpy.sum() の axisは次のurl参照
        # https://deepage.net/features/numpy-axis.html
        return np.sum(x**2, axis=1)


# def tangent_line(f, x):
#     d = numerical_gradient(f, x)
#     print(d)
#     y = f(x) - d*x
#     return lambda t: d*t + y


if __name__ == '__main__':
    main()

↑こう書くと、↓こう表示されます f:id:end0tknr:20171119080015p:plain

opencv3 + python による物体検出 (失敗でしたが、間取り図の引違い窓検知)

今回は上手く行きませんでしたが、今後の為にメモ

以下は参考url

gihyo.jp

STEP1 正解画像と、画像listの準備

f:id:end0tknr:20171111202506p:plain f:id:end0tknr:20171111202516p:plain f:id:end0tknr:20171111202510p:plain

↑こちらのような引違い窓のpng(80×44 ~ 15×137)を10コ作成し、 これらの一覧を img_ok_list.txt に記載しました。

画像listには「file名、物体数、座標x, 座標y, 幅, 高さ」を指定するようです

./win_img_ok/window_900_h.png   1 16 16  49   8
./win_img_ok/window_900_v.png   1 17 14   7  50
./win_img_ok/window_1800_h.png  1 12 14  97   8
./win_img_ok/window_1800_v.png  1 14  9   8  97
./win_img_ok/引違い外窓_h.png   1  8  8  60  10
./win_img_ok/引違い外窓_v.png   1  7  8   9  60
./win_img_ok/引違い窓_3枚_h.png 1  6  4 124   7
./win_img_ok/引違い窓_3枚_v.png 1  4  6   7 124
./win_img_ok/引違い窓_4枚_h.png 1  6  4 124   7
./win_img_ok/引違い窓_4枚_v.png 1  4  6   7 124

STEP2 opencv_createsamples の実行

以下の通り。この辺りの引数の意味を理解していないことが、よくなかったのかも

$ /usr/local/bin/opencv_createsamples \
  -info ./img_ok_list.txt \ # 正解画像list
  -vec window_hikichigai.vec \  # 出力するサンプルfile
  -num 10 \                     # 出力するサンプル数
  -bgcolor 255 \                # 背景色
  -w 24 -h 24                   # サンプル画像のsize...?

STEP3 NG画像と、画像listの準備

NG画像は適当に用意し、 img_ng_list.txt にはfile名だけ記載しました

f:id:end0tknr:20061230161422j:plain f:id:end0tknr:20100620181922j:plain f:id:end0tknr:20171111202724p:plain f:id:end0tknr:20171111202732p:plain

./win_img_ng/alcatraz2.jpg
./win_img_ng/AquaTermi_lowcontrast.JPG
./win_img_ng/book_frontal.JPG
./win_img_ng/book_perspective.JPG
./win_img_ng/boy_on_hill.jpg
./win_img_ng/calibration_setup.JPG
./win_img_ng/ceramic-houses_t0.png
./win_img_ng/climbing_1_small.jpg
./win_img_ng/crans_1_small.jpg
./win_img_ng/empire.jpg
./win_img_ng/fisherman.jpg
./win_img_ng/FIX窓.png
./win_img_ng/sf_view1.jpg
./win_img_ng/sunset_tree.jpg
./win_img_ng/turningtorso1.jpg
./win_img_ng/Univ1.jpg
./win_img_ng/両引き戸.png
./win_img_ng/両開き戸.png
./win_img_ng/出入り口.png
./win_img_ng/引込み戸.png
./win_img_ng/引違い内戸.png
./win_img_ng/折り畳み戸.png
./win_img_ng/片引戸.png
./win_img_ng/片開き戸.png
./win_img_ng/窓一般.png

STEP4 opencv_traincascade の実行

/usr/local/bin/opencv_traincascade \
  -data ./model/1/ \             # model出力先
  -vec ./window_hikichigai.vec \ # opencv_createsamples で作成したvec
  -bg ./img_ng_list.txt \        # NG画像list
  -numNeg 25 \                   # NG画像数
  -numPos  9 \                   # sampleデータの8-9割とするらしい
   -w 24 -h 24 \                 # opencv_createsamples と同じにするらしい
  -numStages 8                   # 何のステージだろう...?

STEP5 失敗に終わりましたが、物体認識実行

#!/usr/local/bin/python
# -*- coding: utf-8 -*-
import cv2
import numpy as np
import sys


def main():
    org_file  = sys.argv[1]
    # 学習器(cascade.xml)の指定
    cascade = cv2.CascadeClassifier('./model/1/cascade.xml')
    # 予測対象の画像の指定
    img_org = cv2.imread(org_file, 0)
    
    ret, img_mono = cv2.threshold(img_org,
                                 200,               # 閾値
                                 256,               # 画素値の最大値
                                 cv2.THRESH_BINARY) # 2値化type

    point = cascade.detectMultiScale(img_mono, 1.1, 3)

    if len(point) > 0:
        for rect in point:
            cv2.rectangle(img_org,
                          tuple(rect[0:2]),
                          tuple(rect[0:2]+rect[2:4]),
                          (0, 0,255),
                          thickness=2)
    else:
        print "no detect"

    cv2.imwrite('detected.jpg', img_org)

    
if __name__ == '__main__':
    main()

↑こう書くと↓こう表示されます

f:id:end0tknr:20171111202826p:plain:w270 f:id:end0tknr:20171111202832j:plain:w270

opencv3 + python による顔検出 (基本のlena検出)

opencvでは基本のlena検出ですが、 opencv3 + python のセットでは実施たことがなかった為

#!/usr/local/bin/python
# -*- coding: utf-8 -*-
import cv2

def main():
    image_path = "lena.jpg"

    # グレースケールとして、file読込み
    image_gray = cv2.imread(image_path,0)

    # カスケード分類器の特徴量を取得.
    # 私の場合、/usr/local/share/OpenCV 以下に複数installされていました
    cascade = cv2.CascadeClassifier(
        "/usr/local/share/OpenCV/haarcascades/haarcascade_frontalface_alt2.xml")

    # detectMultiScale() の引数の意味は、きちんとは理解していません
    facerect = cascade.detectMultiScale(image_gray,
                                        scaleFactor=1.1,
                                        minNeighbors=1,
                                        minSize=(50,50))
    if len(facerect) == 0:
        return
    
    print "face detected !!"
    print facerect

    #検出した顔を四角で描画
    for rect in facerect:
        cv2.rectangle(image_gray,
                      tuple(rect[0:2]),
                      tuple(rect[0:2]+rect[2:4]),
                      (255, 255, 255),
                      thickness=2)
    # 結果保存
    cv2.imwrite("detected.jpg", image_gray)


if __name__ == '__main__':
    main()

↑こう書くと↓こう表示されます
f:id:end0tknr:20171111173955j:plain:w270 f:id:end0tknr:20171111173959j:plain:w270

opencv.matchTemplate() によるテンプレート物体認識

テンプレートマッチングは、様々なurlで紹介されていますが、 私の場合、次のurlを参考にさせて頂きました。

Pythonでテンプレートマッチング、OpenCVサンプルコードと解説 : ネットサーフィンの壺

詳細は以下で、w1800の引違い窓の画像をテンプレートとし、同様の開口を検出しています。

で、 お手軽なものの、拡大縮小や回転には弱そう という印象。

#!/usr/local/bin/python
# -*- coding: utf-8 -*-
from PIL import Image
import cv2
from datetime import datetime
import matplotlib
matplotlib.use('Agg')
import matplotlib.pylab as plb
import numpy as np
import sys

def main():
    org_file  = sys.argv[1]
    tmpl_file = sys.argv[2]

    org_img  = cv2.imread(org_file)
    # グレースケール化
    org_gray_tmp = cv2.cvtColor(org_img, cv2.COLOR_BGR2GRAY)

    tmpl_img = cv2.imread(tmpl_file,0)
    w, h = tmpl_img.shape[::-1]
    
    res = cv2.matchTemplate(org_gray_tmp,
                            tmpl_img,
                            cv2.TM_CCOEFF_NORMED)
    # 類似度の閾値以上のものを、描画
    threshold = 0.8  #類似度の閾値
    loc = np.where( res >= threshold)
    for pt in zip(*loc[::-1]):
        cv2.rectangle(org_img, pt, (pt[0] + w, pt[1] + h), (0,0,255), 2)

    time_str = datetime.now().strftime("%Y%m%d_%H%M%S")
    new_file = 'new_' + time_str + '.png'
    cv2.imwrite(new_file, org_img)

    
if __name__ == '__main__':
    main()

↑こう書くと↓こう表示されます。 閾値(threshold)を変え、複数回、行っています。

f:id:end0tknr:20171103163626p:plain:w300  テンプレート(窓)→f:id:end0tknr:20171105200430p:plain

f:id:end0tknr:20171105200328p:plain:w270 f:id:end0tknr:20171105200331p:plain:w270

opencv.approxPolyDP() による 画像から抽出された境界(輪郭)の直線近似

opencv.findContours() による 画像の境界(輪郭)探索 - end0tknr's kipple - 新web写経開発

先日のエントリの続き。詳細は、以下参照。

#!/usr/local/bin/python
# -*- coding: utf-8 -*-
from PIL import Image
import cv2
from datetime import datetime
import matplotlib
matplotlib.use('Agg')
import matplotlib.pylab as plb
import numpy as np
import sys

# http://lang.sist.chukyo-u.ac.jp/classes/OpenCV/py_tutorials/py_imgproc/py_contours/py_contour_features/py_contour_features.html

def main():
    org_file = sys.argv[1]

    img_org = cv2.imread(org_file)
    # グレースケール化
    img_tmp = cv2.cvtColor(img_org, cv2.COLOR_BGR2GRAY)

    # 2値化
    # - cv2.findContours()は、黒と背景、白を物体として判定する為
    #   cv2.THRESH_BINARY_INV で 2値化し、ネガポジ反転
    # - cv2.THRESH_BINARY は単なる2値化
    ret, img_tmp = cv2.threshold(img_tmp,
                                 250,                  # 閾値
                                 256,                  # 画素値の最大値
                                cv2.THRESH_BINARY_INV) # 2値化type

    time_str = datetime.now().strftime("%Y%m%d_%H%M%S")
    tmp_file = 'tmp_' + time_str + '.png'
    cv2.imwrite(tmp_file, img_tmp)

    # 境界線探索
    # - 第2引数:
    #   - cv2.RETR_EXTERNAL は最外周のみ探索
    #   - cv2.RETR_TREE     は全境界(輪郭? 等高線?)を探索
    # - 返り値:
    #   - contours : 探索された境界
    #   - hierarchy: 境界が複数ある場合の階層
    ret, contours, hierarchy = cv2.findContours(img_tmp,
                                                cv2.RETR_EXTERNAL,
#                                                 cv2.RETR_TREE,
                                                cv2.CHAIN_APPROX_SIMPLE )
#                                                 cv2.CHAIN_APPROX_NONE )

    contours.sort(key=cv2.contourArea, reverse=True)
    
    i  = 0
    for contour in contours:
        arclen = cv2.arcLength(contour,
                               True) # 対象領域が閉曲線の場合、True
        approx = cv2.approxPolyDP(contour,
                                  0.005*arclen,  # 近似の具合?
                                  True)
        print approx

           #  B   G   R
        color = \
           (  0,  0,255) if i % 6 == 0 else \
           (  0,255,  0) if i % 6 == 1 else \
           (255,  0,  0) if i % 6 == 2 else \
           (  0,255,255) if i % 6 == 3 else \
           (255,255,  0) if i % 6 == 4 else (255,  0,255)

        # 境界の描画 ( img_org データに contours データをマージ )
        cv2.drawContours(img_org,
                         [approx],
                         -1,    # 表示する輪郭. 全表示は-1
                         color,
                         2)    # 等高線の太さ
        i += 1
        if i > 3:
            break
        
    new_file = 'new_' + time_str + '.png'
    cv2.imwrite(new_file, img_org)


if __name__ == '__main__':
    main()

↑こう書くと↓こう変換されます。

以前の単純な境界抽出と比較すると、窓の部分が、直線になっていることが分かります。

f:id:end0tknr:20171104233712p:plain f:id:end0tknr:20171105103250p:plain

opencv.contourArea() と arcLength() で領域の面積と周囲の長さを算出

opencv.findContours() による 画像の境界(輪郭)探索 - end0tknr's kipple - 新web写経開発

↑このエントリのおまけ、というか、記載漏れ

#!/usr/local/bin/python
# -*- coding: utf-8 -*-
from PIL import Image
import cv2
from datetime import datetime
import matplotlib
matplotlib.use('Agg')
import matplotlib.pylab as plb
import numpy as np
import sys

def main():
    org_file = sys.argv[1]

    img_org = cv2.imread(org_file)
    # グレースケール化
    img_tmp = cv2.cvtColor(img_org, cv2.COLOR_BGR2GRAY)

    # 2値化
    # - cv2.findContours()は、黒と背景、白を物体として判定する為
    #   cv2.THRESH_BINARY_INV で 2値化し、ネガポジ反転
    # - cv2.THRESH_BINARY は単なる2値化
    ret, img_tmp = cv2.threshold(img_tmp,
                                 250,                  # 閾値
                                 256,                  # 画素値の最大値
                                cv2.THRESH_BINARY_INV) # 2値化type

    time_str = datetime.now().strftime("%Y%m%d_%H%M%S")
    tmp_file = 'tmp_' + time_str + '.png'
    cv2.imwrite(tmp_file, img_tmp)

    # 境界線探索
    # - 第2引数:
    #   - cv2.RETR_EXTERNAL は最外周のみ探索
    #   - cv2.RETR_TREE     は全境界(輪郭? 等高線?)を探索
    # - 返り値:
    #   - contours : 探索された境界
    #   - hierarchy: 境界が複数ある場合の階層
    ret, contours, hierarchy = cv2.findContours(img_tmp,
                                                cv2.RETR_EXTERNAL,
#                                                 cv2.RETR_TREE,
                                                cv2.CHAIN_APPROX_SIMPLE )
#                                                 cv2.CHAIN_APPROX_NONE )
    i  = 0
    for contour in contours:
          #  B   G   R
        color = \
          (  0,  0,255) if i % 6 == 0 else \
          (  0,255,  0) if i % 6 == 1 else \
          (255,  0,  0) if i % 6 == 2 else \
          (  0,255,255) if i % 6 == 3 else \
          (255,255,  0) if i % 6 == 4 else (255,  0,255)

        # 境界の描画 ( img_org データに contours データをマージ )
        cv2.drawContours(img_org,
                         contours,
                         i,    # 表示する輪郭. 全表示は-1
                         color,
                         2)    # 等高線の太さ
                         
        area = cv2.contourArea(contours[i])
        arclen = cv2.arcLength(np.array(contours[i]),
                               True) # 対象領域が閉曲線の場合、True
        print "AREA=" + str(area) + "\tARC_LEN=" + str(arclen)
        
        i += 1
        if i > 3:
            break
    new_file = 'new_' + time_str + '.png'
    cv2.imwrite(new_file, img_org)


if __name__ == '__main__':
    main()

↑こう書くと↓こう変換され、また、算出されます

f:id:end0tknr:20120723195236j:plain:w350

f:id:end0tknr:20171104233709p:plain:w270 f:id:end0tknr:20171104233712p:plain:w270

$ python foo.py 42_2.jpg 
AREA=84122.0    ARC_LEN=1304.79393649
AREA=377.0  ARC_LEN=72.284270525
AREA=13.0   ARC_LEN=41.3137083054

opencv.inRange() と bitwise_and() による 画像の特定色の抽出

opencv.findContours() による 画像の境界(輪郭)探索 - end0tknr's kipple - 新web写経開発

先程のエントリでは、建物の間取り図のみが記載された画像の輪郭を抽出しましたが、 外構も描かれたケースを考えてみた。

抽出方法と結果は、以下の script の通りです。

#!/usr/local/bin/python
# -*- coding: utf-8 -*-
from PIL import Image
import cv2
from datetime import datetime
import matplotlib
matplotlib.use('Agg')
import matplotlib.pylab as plb
import numpy as np
import sys

def main():
    org_file = sys.argv[1]

    img_org = cv2.imread(org_file)

    img_hsv = cv2.cvtColor(img_org, cv2.COLOR_BGR2HSV)
 
    # 取得する色の範囲を指定する
    lower_color = np.array([  0,  0,  0])
    upper_color = np.array([130,130,130])

    # 指定した色に基づいたマスク画像の生成
    img_mask = cv2.inRange(img_hsv, lower_color, upper_color)

    # フレーム画像とマスク画像の共通の領域を抽出する。
    img_tmp = cv2.bitwise_and(img_hsv, img_hsv, mask=img_mask)

    time_str = datetime.now().strftime("%Y%m%d_%H%M%S")
    # 一旦、fileの出力
    tmp_file = 'tmp_' + time_str + '.png'
    cv2.imwrite(tmp_file, img_tmp)

    # 抽出した壁面が、なぜか赤色となる為、2値化 & ネガポジ反転
    img_tmp = cv2.cvtColor(img_tmp, cv2.COLOR_BGR2GRAY)
    ret, img_tmp = cv2.threshold(img_tmp,
                                 10,                # 閾値
                                 256,               # 画素値の最大値
                                 cv2.THRESH_BINARY_INV) # 2値化type

    new_file = 'new_' + time_str + '.png'
    cv2.imwrite(new_file, img_tmp)


if __name__ == '__main__':
    main()

↑こう書くと↓こう変換されます。

色を抽出するまではできましたが、ドットが粗い?部分があるので 輪郭を求めるには、一旦、膨張処理を行った方が良い気がします

f:id:end0tknr:20120723195307j:plain:w350

f:id:end0tknr:20171104211747p:plain:w270 f:id:end0tknr:20171104211749p:plain:w270

opencv.findContours() による 画像の境界(輪郭)探索

以下、記載の通り。

外壁面のみ、描画したかったのですが、それは今後

#!/usr/local/bin/python
# -*- coding: utf-8 -*-
from PIL import Image
import cv2
from datetime import datetime
import matplotlib
matplotlib.use('Agg')
import matplotlib.pylab as plb
import numpy as np
import sys

def main():
    org_file = sys.argv[1]

    img_org = cv2.imread(org_file)
    # グレースケール化
    img_tmp = cv2.cvtColor(img_org, cv2.COLOR_BGR2GRAY)

    # 2値化
    # - cv2.findContours()は、黒と背景、白を物体として判定する為
    #   cv2.THRESH_BINARY_INV で 2値化し、ネガポジ反転
    # - cv2.THRESH_BINARY は単なる2値化
    ret, img_tmp = cv2.threshold(img_tmp,
                                 250,                  # 閾値
                                 256,                  # 画素値の最大値
                                cv2.THRESH_BINARY_INV) # 2値化type

    time_str = datetime.now().strftime("%Y%m%d_%H%M%S")
    tmp_file = 'tmp_' + time_str + '.png'
    cv2.imwrite(tmp_file, img_tmp)

    # 境界線探索
    # - 第2引数:
    #   - cv2.RETR_EXTERNAL は最外周のみ探索
    #   - cv2.RETR_TREE     は全境界(輪郭? 等高線?)を探索
    # - 返り値:
    #   - contours : 探索された境界
    #   - hierarchy: 境界が複数ある場合の階層
    ret, contours, hierarchy = cv2.findContours(img_tmp,
#                                                cv2.RETR_EXTERNAL,
                                                 cv2.RETR_TREE,
                                                cv2.CHAIN_APPROX_SIMPLE )
#                                                 cv2.CHAIN_APPROX_NONE )
    i  = 0
    for contour in contours:
          #  B   G   R
        color = \
          (  0,  0,255) if i % 6 == 0 else \
          (  0,255,  0) if i % 6 == 1 else \
          (255,  0,  0) if i % 6 == 2 else \
          (  0,255,255) if i % 6 == 3 else \
          (255,255,  0) if i % 6 == 4 else (255,  0,255)

        # 境界の描画 ( img_org データに contours データをマージ )
        cv2.drawContours(img_org,
                         contours,
                         i,    # 表示する輪郭. 全表示は-1
                         color,
                         2)    # 等高線の太さ
        print i
        i += 1
        if i > 3:
            break
    new_file = 'new_' + time_str + '.png'
    cv2.imwrite(new_file, img_org)


if __name__ == '__main__':
    main()

↑こう書くと↓こう変換されます。途中の2値化画像もあります

f:id:end0tknr:20120723195236j:plain:w350

f:id:end0tknr:20171104153458p:plain:w270 f:id:end0tknr:20171104153504p:plain:w270

opencv.morphologyEx() による画像のオープニング/ クロージング処理

medianBlur() による中央値フィルタ、erode() / dilate() による膨張/収縮 の関連。

今回はopencv.morphologyEx() による画像のオープニング/ クロージング処理。

scriptと、それによる変換結果は、以降に記載していますが、今回も期待過多

type 内容
オープニング 収縮処理の後に、膨張処理を実施
クロージング 膨張処理の後に、収縮処理を実施

opencv.erode() / dilate() による画像の膨張処理 / 収縮処理 - end0tknr's kipple - 新web写経開発

opencv.medianBlur() で、中央値フィルタ - end0tknr's kipple - 新web写経開発

参考url

モルフォロジー変換 — OpenCV-Python Tutorials

Python OpenCV3でオープニング・クロージングを施してノイズを除去してみる | from umentu import stupid

script

#!/usr/local/bin/python
# -*- coding: utf-8 -*-
import cv2
import numpy as np
import sys

def main():
    org_file = sys.argv[1]

    # 強制的にグレー画像として読む
    # http://opencv.jp/opencv-2.1/cpp/reading_and_writing_images_and_video.html
    img = cv2.imread(org_file, 0)
    cv2.imwrite('org.png', img)

    # グレースケールを更に2値化
    ret, img_new = cv2.threshold(img,
                                 200,               # 閾値
                                 256,               # 画素値の最大値
                                 cv2.THRESH_BINARY) # 2値化type

    # 近傍の定義
    neiborhood = np.array([[1, 1, 1],
                           [1, 1, 1],
                           [1, 1, 1]],
                           np.uint8)
    # neiborhood = np.array([[0, 1, 0],
    #                        [1, 1, 1],
    #                        [0, 1, 0]],
    #                        np.uint8)

    # 1回目: open=膨張、close=収縮 
#    img_new = cv2.morphologyEx(img_new,cv2.MORPH_OPEN, neiborhood)
    img_new = cv2.morphologyEx(img_new,cv2.MORPH_CLOSE,neiborhood)
    # 2回目: open=膨張、close=収縮 
#    img_new = cv2.morphologyEx(img_new,cv2.MORPH_OPEN, neiborhood)
#    img_new = cv2.morphologyEx(img_new,cv2.MORPH_CLOSE,neiborhood)
    # 3回目: open=膨張、close=収縮 
#    img_new = cv2.morphologyEx(img_new,cv2.MORPH_OPEN, neiborhood)
#    img_new = cv2.morphologyEx(img_new,cv2.MORPH_CLOSE,neiborhood)
    
    cv2.imwrite('new.png', img_new)


if __name__ == '__main__':
    main()

↑こう書くと↓こう変換されます f:id:end0tknr:20171103163626p:plain:w270 f:id:end0tknr:20171104075249p:plain:w270

opencv.erode() / dilate() による画像の膨張処理 / 収縮処理

Python OpenCV3で画素の膨張処理(dilation)と収縮処理(erosion) (ちょっと解説も) | from umentu import stupid

ほぼ、上記urlのまんま.

細線消去に関しては、 medianBlur() による中央値処理より、dilate() の方が良い気がします。

#!/usr/local/bin/python
# -*- coding: utf-8 -*-
import cv2
import numpy as np
import sys

def main():
    org_file = sys.argv[1]

    # 強制的にグレー画像として読む
    # http://opencv.jp/opencv-2.1/cpp/reading_and_writing_images_and_video.html
    img = cv2.imread(org_file, 0)
    cv2.imwrite('org.png', img)

    ret, img_new = cv2.threshold(img,
                                 200,               # 閾値
                                 256,               # 画素値の最大値
                                 cv2.THRESH_BINARY) # 2値化type


    # 近傍の定義
    neiborhood = np.array([[0, 1, 0],
                           [1, 1, 1],
                           [0, 1, 0]],
                           np.uint8)

    # 収縮
    img_new = cv2.dilate(img_new,
                         neiborhood,
                         iterations=2)
    # 膨張
    # img_new = cv2.erode(img_new,
    #                     neiborhood,
    #                     iterations=2)
    
    cv2.imwrite('new.png', img_new)


if __name__ == '__main__':
    main()

↑こう書くと↓こう変換されます

f:id:end0tknr:20171103163626p:plain:w350 f:id:end0tknr:20171104055146p:plain:w270 f:id:end0tknr:20171104055704p:plain:w270