end0tknr's kipple - web写経開発

太宰府天満宮の狛犬って、妙にカワイイ

(再) install WindowsApplicationDriver

https://end0tknr.hateblo.jp/entry/20190323/1553338368

先日、上記entryにて、Windows Application Driver をinstallしていますが、 あまりに中途半端なので、再度、hands-on。

find_element(s)by_accessibility_id() , find_element(s)by_class_name() , find_element(s)by_id() , find_element(s)by_name() , find_element(s)by_tag_name() , find_element(s)by_xpath() 等、要素探索のmethodが用意されていますが、 「WinAppDriver UI Recorder」でXPATHを調べ find_element_by_xpath()による要素探索が最も良かった。

ただし、アプリによっては「WinAppDriver UI Recorder」や「inspect.exe」による 調査中にアプリが強制終了する点が、なかなか難しい。

事前準備

Windows Application Driver

以下の WinAppDriver.exe を起動すると、port:4723 経由でwindowsアプリを操作できます。

WinAppDriver UI Recorder

https://github.com/Microsoft/WinAppDriver/releases/download/UiR_v1.0-RC/WinAppDriverUIRecorder.zip

上記zipを解凍し、 WinAppDriverUiRecorder.exe を起動すると、 アプリの各要素のXPATHを調べることができます。

inspect.exe

「WinAppDriver UI Recorder」と同様ですが、 アプリの各要素のクラス名や要素名等の様々な項目を調べることができます。

https://developer.microsoft.com/ja-jp/windows/downloads/sdk-archive からダウンロードし、インストールすると、以下に配備されます。

C:\Program Files (x86)\Windows Kits\10\bin\10.0.17763.0\x64\inspect.exe

https://developer.microsoft.com/ja-jp/windows/downloads/sdk-archive

sample script

# -*- coding: utf-8 -*-
from appium import webdriver
import time

def main():
    ## アプリ起動
    desired_caps = {}
    desired_caps["app"] = r"C:\SCOOP\SCOOP22\Program\PLANMAN.exe"
    driver = webdriver.Remote(
        command_executor='http://127.0.0.1:4723',
        desired_capabilities= desired_caps)

    win_planman = init_planman(driver)
    print win_planman

    ## ↑ここまではうまく動作しました。
    ## ↓この先で、ListViewやTreeViewを探索したかったのですが
    ##   アプリが強制終了するなど、うまく動作しませんでした。
    pane_tree = win_planman.find_elements_by_class_name("ListLiew")
    print pane_tree

    
    ## 終了
    driver.quit()

def init_planman(driver):
    ## logon画面から遷移
    xpath_str = \
        "/".join(['/Pane[@Name="デスクトップ 1"][@ClassName="#32769"]',
                  'Window[@Name="ログオン"][@ClassName="ThunderRT6FormDC"]'])
    diagram_logon = driver.find_element_by_xpath(xpath_str)

    xpath_str = \
        "//Button[@Name=\"OK\"][@ClassName=\"ThunderRT6CommandButton\"]"
    diagram_logon.find_element_by_xpath(xpath_str).click()

    
    ## version check画面から遷移
    xpath_str = \
        "/".join(['/Pane[@Name="デスクトップ 1"][@ClassName="#32769"]',
                  'Window[@Name="SCOOP22 マネージャ"][@ClassName="#32770"]'])
    try:
        diagram_ver_chk = driver.find_element_by_xpath(xpath_str)
    except Exception as e:
        pass  ## version check画面が単に見つからない場合、無視して進みます
    else:
        xpath_str = "//Button[@Name=\"OK\"][@ClassName=\"Button\"]"
        diagram_ver_chk.find_element_by_xpath(xpath_str).click()
    
    ## plan manager探索
    xpath_str = \
        "/".join(['/Pane[@Name="デスクトップ 1"][@ClassName="#32769"]',
                  'Window[@Name="SCOOP22 マネージャ - soop22"]'+
                  '[@ClassName="ThunderRT6FormDC"]'])
    try:
        win_planman = driver.find_element_by_xpath(xpath_str)
    except Exception as e:
        print e , " " , xpath_str
        return

    return win_planman


if __name__ == '__main__':
    main()

サーバにinstallされているOSやMWの一覧を自動収集したい (windows版)

サーバにinstallされているOSやMWの一覧を自動収集したい (centos版) - end0tknr's kipple - 新web写経開発

先日の上記エントリのwindows版。

windowsの場合、コマンドライン(power shell Get-ChildItem)から以下のようにインストール済の一覧を取得できます

PS C:\Users\end0t> Get-ChildItem -Path(
>> 'HKLM:SOFTWARE\Microsoft\Windows\CurrentVersion\Uninstall',
>> 'HKCU:SOFTWARE\Microsoft\Windows\CurrentVersion\Uninstall') |
>> % { Get-ItemProperty $_.PsPath | Select-Object DisplayName, DisplayVersion, Publisher }

DisplayName                                                           DisplayVersion  Publisher
-----------                                                           --------------  ---------
7-Zip 18.05 (x64)                                                     18.05           Igor Pavlov
Android Studio                                                        3.3             Google LLC
EPSON PX-049A Series プリンター アンインストール                                      Seiko Epson Corporation
Appium 1.11.0                                                         1.11.0          Appium Developers
GIMP 2.10.6                                                           2.10.6          The GIMP Team
Git version 2.19.1                                                    2.19.1          The Git Development Community
Mozilla Firefox 64.0.2 (x64 ja)                                       64.0.2          Mozilla
Mozilla Maintenance Service                                           61.0            Mozilla
Microsoft Project Professional 2016                                   16.0.4266.1001  Microsoft Corporation
Microsoft Office Professional Plus 2016                               16.0.4266.1001  Microsoft Corporation
Microsoft Visio Professional 2016                                     16.0.4266.1001  Microsoft Corporation
OWASP Zed Attack Proxy 2.7.0                                          2.7.0           OWASP ZAP
Vulkan Run Time Libraries 1.1.70.0                                    1.1.70.0        LunarG, Inc.
Canon MP470 series
Windows SDK for Windows Store Apps DirectX x64 Remote                 10.1.16299.91   Microsoft Corporation
Intel(R) Management Engine Components                                 11.7.0.1035     Intel Corporation
Application Verifier x64 External Package                             10.1.16299.91   Microsoft
Intel(R) PRO/Wireless Driver                                          20.50.0001.8400 Intel Corporation
Intel(R) Management Engine Components                                 1.0.0.0         Intel Corporation
Microsoft Visual C++ 2017 X64 Debug Runtime - 14.16.27024             14.16.27024     Microsoft Corporation
Windows App Certification Kit Native Components                       10.1.17763.132  Microsoft Corporation
Java(TM) SE Development Kit 10.0.1 (64-bit)                           10.0.1.0        Oracle Corporation
Universal CRT Tools x64                                               10.1.17763.132  Microsoft Corporation
Windows SDK for Windows Store Apps DirectX x64 Remote                 10.1.17134.12   Microsoft Corporation
Lenovo Active Protection System                                       1.82.00.17      Lenovo
CMake                                                                 3.14.0          Kitware
TortoiseSVN 1.10.1.28295 (64 bit)                                     1.10.28295      TortoiseSVN
   :

install WindowsApplicationDriver

またも「RPA風に使えるかも」関連.

appium & Windows Application Driver 経由でのwindowsアプリ操作を期待しましたが、 まず、appium の起動は不要でした。 また、単純なボタンのクリック等はできましたが、要素の探索等はできませんでした。 (詳しいドキュメントを見つけることができなかった為)

参考url

install WindowsApplicationDriver 関連

WindowsApplicationDriver自体は、 https://github.com/Microsoft/WinAppDriver から インストーラをダウンロードし、実行するだけで、 C:\Program Files (x86)\Windows Application Driver にinstallされます

更にnodejsやpythonのモジュールをインストールすれば完了

C:\Users\end0t>npm install --global --production windows-build-tools
C:\Users\end0t>npm install appium-windows-driver
C:\Users\end0t>pip install Appium-Python-Client
C:\Users\end0t>pip install setuptools

install inspect.exe

捜査対象のアプリの要素名を調べる為、inspect.exe もあると便利です

https://developer.microsoft.com/ja-jp/windows/downloads/sdk-archive からダウンロードし、インストールすると、以下に配備されます。

C:\Program Files (x86)\Windows Kits\10\bin\10.0.17763.0\x64\inspect.exe

軽く動作確認

PS C:\Program Files (x86)\Windows Application Driver> pwd

Path
----
C:\Program Files (x86)\Windows Application Driver


PS C:\Program Files (x86)\Windows Application Driver> .\WinAppDriver.exe
Windows Application Driver listening for requests at: http://127.0.0.1:4723/
Press ENTER to exit.

↑こちらのように WinAppDriver.exe を起動した状態で ↓microsoftから配布されているサンプルscriptが動作すればOK

"""
//******************************************************************************
//
// Copyright (c) 2016 Microsoft Corporation. All rights reserved.
//
// This code is licensed under the MIT License (MIT).
//
// THE SOFTWARE IS PROVIDED "AS IS", WITHOUT WARRANTY OF ANY KIND, EXPRESS OR
// IMPLIED, INCLUDING BUT NOT LIMITED TO THE WARRANTIES OF MERCHANTABILITY,
// FITNESS FOR A PARTICULAR PURPOSE AND NONINFRINGEMENT. IN NO EVENT SHALL THE
// AUTHORS OR COPYRIGHT HOLDERS BE LIABLE FOR ANY CLAIM, DAMAGES OR OTHER
// LIABILITY, WHETHER IN AN ACTION OF CONTRACT, TORT OR OTHERWISE, ARISING FROM,
// OUT OF OR IN CONNECTION WITH THE SOFTWARE OR THE USE OR OTHER DEALINGS IN
// THE SOFTWARE.
//
//******************************************************************************
"""

import unittest
from appium import webdriver

class SimpleCalculatorTests(unittest.TestCase):

    def setUp(self):
        #set up appium
        desired_caps = {}
        desired_caps["app"] = "Microsoft.WindowsCalculator_8wekyb3d8bbwe!App"
        self.driver = webdriver.Remote(
            command_executor='http://127.0.0.1:4723',
            desired_capabilities= desired_caps)

    def tearDown(self):
        self.driver.quit()

    def test_initialize(self):
        self.driver.find_element_by_accessibility_id("clearButton").click()
        self.driver.find_element_by_accessibility_id("num7Button").click()

        result = self.driver.find_element_by_accessibility_id("CalculatorResults")
        self.assertIn(" 7 ", str(result.text))

    def test_addition(self):
        self.driver.find_element_by_accessibility_id("num1Button").click()
        self.driver.find_element_by_accessibility_id("plusButton").click()
        self.driver.find_element_by_accessibility_id("num7Button").click()
        self.driver.find_element_by_accessibility_id("equalButton").click()

        result = self.driver.find_element_by_accessibility_id("CalculatorResults")
        self.assertIn( " 8 ", str(result.text))

    def test_combination(self):
        self.driver.find_element_by_accessibility_id("num7Button").click()
        self.driver.find_element_by_accessibility_id("multiplyButton").click()
        self.driver.find_element_by_accessibility_id("num9Button").click()
        self.driver.find_element_by_accessibility_id("plusButton").click()
        self.driver.find_element_by_accessibility_id("num1Button").click()
        self.driver.find_element_by_accessibility_id("equalButton").click()
        self.driver.find_element_by_accessibility_id("divideButton").click()
        self.driver.find_element_by_accessibility_id("num8Button").click()
        self.driver.find_element_by_accessibility_id("equalButton").click()

        result = self.driver.find_element_by_accessibility_id("CalculatorResults")
        self.assertIn( " 8 ", str(result.text))

    def test_division(self):
        self.driver.find_element_by_accessibility_id("num8Button").click()
        self.driver.find_element_by_accessibility_id("num8Button").click()
        self.driver.find_element_by_accessibility_id("divideButton").click()
        self.driver.find_element_by_accessibility_id("num1Button").click()
        self.driver.find_element_by_accessibility_id("num1Button").click()
        self.driver.find_element_by_accessibility_id("equalButton").click()

        result = self.driver.find_element_by_accessibility_id("CalculatorResults")
        self.assertIn( " 8 ", str(result.text))

    def test_multiplication(self):
        self.driver.find_element_by_accessibility_id("num9Button").click()
        self.driver.find_element_by_accessibility_id("multiplyButton").click()
        self.driver.find_element_by_accessibility_id("num9Button").click()
        self.driver.find_element_by_accessibility_id("equalButton").click()

        result = self.driver.find_element_by_accessibility_id("CalculatorResults")
        self.assertIn( " 81 ", str(result.text))

    def test_subtraction(self):
        self.driver.find_element_by_accessibility_id("num9Button").click()
        self.driver.find_element_by_accessibility_id("minusButton").click()
        self.driver.find_element_by_accessibility_id("num1Button").click()
        self.driver.find_element_by_accessibility_id("equalButton").click()

        result = self.driver.find_element_by_accessibility_id("CalculatorResults")
        self.assertIn( " 8 ", str(result.text))


if __name__ == '__main__':
    suite = unittest.TestLoader().loadTestsFromTestCase(SimpleCalculatorTests)
    unittest.TextTestRunner(verbosity=2).run(suite)

開発者モード設定画面で、エラー?が表示されましたが、気にせず進めてもよさそうです

f:id:end0tknr:20190323195602p:plain

install appium and Appium-Python-Client to windows 10

「"RPA"風に利用できるかも」と思い、次のurlを参考にさせて頂きながら、 appium を windows10にinstall 。

今回は「とりあえずのinstall」まで行っています。

java , python , nodejs

それぞれが、何の prerequired かであるかは、忘れましたが、 appium 等のinstall 前に以下のversionがinstallされていました。

C:\Users\end0t>java -version
java version "10.0.1" 2018-04-17

C:\Users\end0t>python --version
Python 2.7.16

C:\Users\end0t>node -v
  v10.15.3
C:\Users\end0t>npm -v
  6.4.1

install android studio (3.3.2 for Windows 64-bit (948 MB))

android仮想端末とplatform-toolsが必要ですので、 android studio をinstallしています。

インストーラandroid-studio-ide-182.5314842-windows.exe です。 (ver.3.3.2 という文字列がファイル名にないことが少々、気になります)

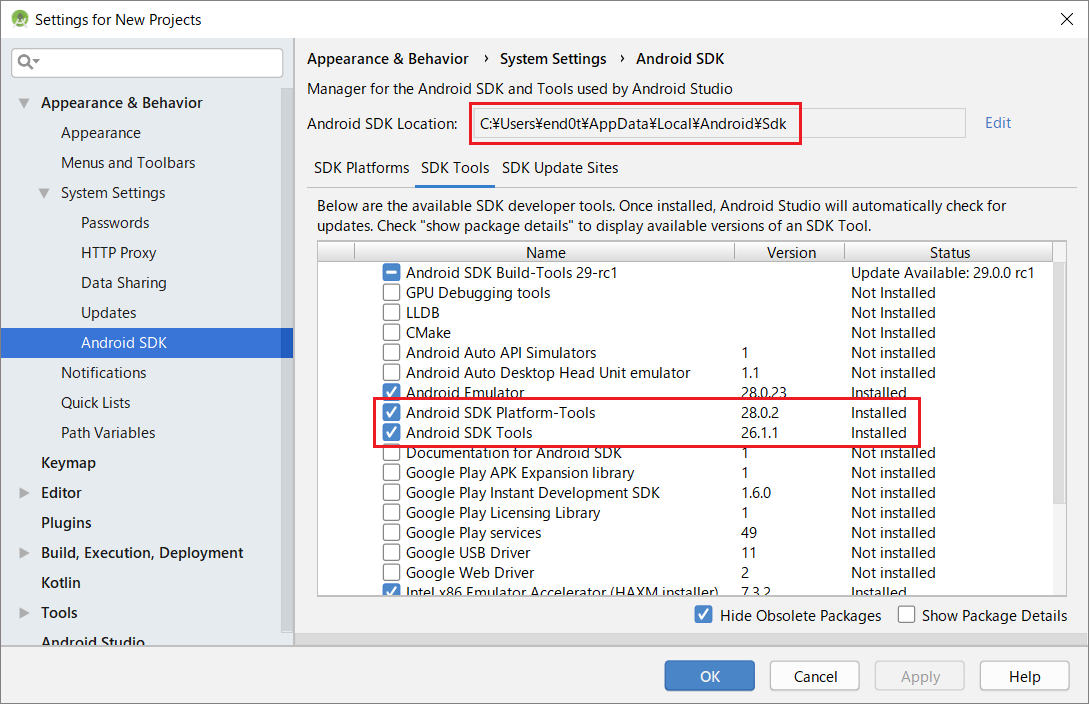
android studioのinstallにより、SDKも合わせてinstallされますが windows環境変数に以下を追加しています。

android studioから仮想端末を作成し、adbで動作確認

次のように追加した仮想端末が認識されていれば、OK

C:\Users\end0t>adb devices
List of devices attached
emulator-5554   device

install appium (GUI版)

http://appium.io/ から appium-desktop-setup-1.11.0.exe をダウンロードし、installするだけです。

install appium (CUI版)

C:\Users\end0t>npm install -g appium
C:\Users\end0t>npm install -g appium-doctor
C:\Users\end0t>appium-doctor

install後の appium の状態?は、appium-doctor が診断してくれます。 私の場合、 windows-build-tools や opencv4nodejs をinstallしています。 ( cmake もinstallしたような)

PS C:\WINDOWS\system32> npm install --global windows-build-tools
PS C:\WINDOWS\system32> npm install --save opencv4nodejs

install Appium-Python-Client

C:\Users\end0t>pip install Appium-Python-Client

軽く動作確認

#!python
# -*- coding: utf-8 -*-
import getopt
import sys
import os
from appium import webdriver
from appium.webdriver.common.touch_action import TouchAction
import unittest


# https://github.com/appium/python-client

class TestAppium(unittest.TestCase):

    def setUp(self):
        desired_caps = {}
        desired_caps["platformName"] = "Android"
        desired_caps["automationName"] = "Appium"
#        desired_caps["automationName"] = "uiautomator2"
        desired_caps['app'] = os.path.abspath(os.path.join(os.path.dirname(__file__),'ApiDemos-debug.apk'))
        desired_caps["platformVersion"] =  "8.1"
        desired_caps['deviceName'] = 'Nexus 5 API 27'
        desired_caps["appPackage"] = "io.appium.android.apis"
        desired_caps["appActivity"] = "io.appium.android.apis.ApiDemos"
        
        self.driver = webdriver.Remote('http://localhost:4723/wd/hub',
                                       desired_caps)

    def tearDown(self):
        self.driver.quit()

    def test_contexts_list(self):
        el = self.driver.find_element_by_class_name('android.widget.ListView')

        actions = TouchAction(self.driver)
        actions.flick_element(el, 0, -300, 0)
        actions.perform()
        sleep(5)


#    def test_find_element(self):

#        elm = self.driver.find_element_by_class_name('android.widget.TextView');
#        print(elm)
#        elm.click()
        
#        TouchAction(self.driver).tap(x=204, y=530).perform()
#        TouchAction(self.driver).tap(x=204, y=700).perform()

        # 要素が見つかるまで ?sec待つ
#        self.driver.implicitly_wait(5)
        
#        elm = self.driver.find_element_by_accessibility_id("App");
#        elm = self.driver.find_element_by_id("android:id/text7");


if __name__ == "__main__":
    unittest.main()

android studio v3.3.2 for Windows 64-bit のinstall時に platform-toolsがinstallされない

以前、installした android studio v3.1 をuninstallし、 android studio v3.3 をre-installしたことが原因でしょうか?

  • C:\Users\end0t.AndroidStudio3.1
  • C:\Users\end0t.AndroidStudio3.3

android studio をuninstallしても削除されない、上記profileを削除後、 再installすることで解消しました。

f:id:end0tknr:20190322081048p:plain

install後は、↓この辺りの環境変数設定も忘れないように - ANDROID_HOME = C:\Users\end0t\AppData\Local\Android\Sdk - PATH = %ANDROID_HOME%\platform-tools

NTPによる時刻同期コマンドと、chrony による時刻同期コマンド

よく忘れるので、メモ

$ sudo chronyc makestep
$ sudo ntpdate ntp.nict.jp

「chronyc makestep」で errorとなる場合、 chronyd が起動していない可能性がある為、以下のコマンドで起動

$ sudo chronyc makestep
506 Cannot talk to daemon

$ sudo systemctl start chronyd
$ sudo chronyc makestep
200 OK

サーバにinstallされているOSやMWの一覧を自動収集したい (centos版)

以下のように perl script書いて、実行したものを xymonあたりで収集すれば、OKな気がします

#!/usr/local/bin/perl
use strict;
use warnings;
use Data::Dumper;

my $OS_INFO_CMD = 'cat /etc/system-release';
my $RPM_LIST_CMD = 'rpm -aq';  # = yum list installed
my @SRC_LIST_CMDS =
    (["mysql",              "/usr/local/mysql/bin/mysql --version"],
     ["perl",               "/usr/local/bin/perl -v"],
     ["java",               "/usr/bin/java -version"],
     ["apache httpd",       "/home/end0tknr/local/apache24/bin/httpd -v"]);

main();
exit(0);

sub main {

    my @sw_list;
    my $os_info  = installed_os_info();
    push(@sw_list,$os_info);
    my $src_list = installed_src_list();
    push(@sw_list,@$src_list);
    my $rpm_list = installed_rpm_list();
    push(@sw_list,@$rpm_list);

    for my $sw_info ( @sw_list ){
        print join("\t",@$sw_info),"\n";
    }
}


sub installed_os_info {

    my $fh;

    my $cmd = $OS_INFO_CMD;
    open($fh,"-|", $cmd) or die "fail open $cmd $!";
    my ($line) =<$fh>;
    close($fh) or die "fail close $cmd $!";

    chomp($line);
    return ["OS",$line];
}

sub installed_src_list {
    
    my @ret;
    for my $cmd ( @SRC_LIST_CMDS ) {
        my $fh;
        open($fh,"-|", "$cmd->[1] 2>&1") or die "fail open $cmd->[1] $!";
        
        my $installed_info = "";
        for my $line ( <$fh> ){
            chomp($line);
            if($line){
                $installed_info = $line;
                push(@ret,["MW",$cmd->[0],$installed_info]);
                last;
            }
        }
        unless( $installed_info ){
            die "fail find installed info $cmd->[1] $!";
        }
        close($fh) or die "fail close $cmd $!";
    }
    return \@ret;
}

sub installed_rpm_list {

    my $fh;
    open($fh,"-|", $RPM_LIST_CMD) or die "fail open $RPM_LIST_CMD $!";

    my @ret;
    for my $line ( sort <$fh> ){
        chomp($line);
        push(@ret,["MW",$line]);
    }
    
    close($fh) or die "fail close $RPM_LIST_CMD $!";

    return \@ret;
}

1;
$ ./get_inventory.pl 
OS  CentOS Linux release 7.4.1708 (Core) 
MW  mysql   /usr/local/mysql/bin/mysql  Ver 14.14 Distrib 5.6.40, for Linux (x86_64) using  EditLine wrapper
MW  perl    This is perl 5, version 26, subversion 2 (v5.26.2) built for x86_64-linux-thread-multi
MW  java    openjdk version "1.8.0_161"
MW  apache httpd    Server version: Apache/2.4.34 (Unix)
MW  GeoIP-1.5.0-11.el7.x86_64
MW  ImageMagick-6.7.8.9-15.el7_2.x86_64
MW  ImageMagick-devel-6.7.8.9-15.el7_2.x86_64
MW  NetworkManager-1.8.0-9.el7.x86_64
MW  NetworkManager-libnm-1.8.0-9.el7.x86_64
MW  NetworkManager-team-1.8.0-9.el7.x86_64
MW  NetworkManager-tui-1.8.0-9.el7.x86_64
MW  NetworkManager-wifi-1.8.0-9.el7.x86_64
MW  OpenEXR-libs-1.7.1-7.el7.x86_64
MW  acl-2.2.51-12.el7.x86_64
MW  aether-api-1.13.1-13.el7.noarch
<略>
MW  yum-3.4.3-154.el7.centos.noarch
MW  yum-metadata-parser-1.1.4-10.el7.x86_64
MW  yum-plugin-fastestmirror-1.1.31-42.el7.noarch
MW  zip-3.0-11.el7.x86_64
MW  zlib-1.2.7-17.el7.x86_64
MW  zlib-devel-1.2.7-17.el7.x86_64
$ 

IT資産管理(CMDB)のGLPIをinstall

https://glpi-project.org/

https://it.hirokun.net/entry/amazonlinux-glpi943

GLPI自体は、phpな tar.gz を解答し、配備するだけですが、 必要なライブラリ群をsrcからinstallしていたら、どうも上手くいかないので、 上記urlを参考にさせて頂きながら、パッケージ(yum)でinstall。

以下は、雑多なメモ

リポジトリ追加

$ sudo yum install epel-release
$ rpm -Uvh https://dl.fedoraproject.org/pub/epel/epel-release-latest-7.noarch.rpm
$ rpm -Uvh http://rpms.famillecollet.com/enterprise/remi-release-7.rpm

php関連 install

$ sudo yum install php70-pecl-apcu php70-xmlrpc php70-ldap php70-imap php70-opcache

$ sudo yum install php70
$ sudo yum install php70-php-pecl-apcu
$ sudo yum install php70-php-xmlrpc
$ sudo yum install php70-php-ldap
$ sudo yum install php70-php-imap
$ sudo yum install php70-php-opcache
$ sudo yum install php70-php-mbstring
$ sudo yum install php70-php-gd
$ sudo yum install php70-php-mysqlnd
$ sudo yum install php-pear-CAS

GLPIに最初からあるユーザ

  • 管理者アカウント:glpi/glpi
  • 技術者アカウント:tech/tech
  • 標準アカウント: normal/normal
  • 投稿専用アカウント: post-only/postonly

REST API

$ curl -X GET \
-H 'Content-Type: application/json' \
-H "Authorization: Basic Z2xwaTpnbHBp" \
-H "App-Token: f7g3csp8mgatg5ebc5elnazakw20i9fyev1qopya7" \
'http://path/to/glpi/apirest.php/initSession'

↑こちらのbasic認証は私の環境で動作しましたが、 以下の user_token 認証は動作しない。。。。

$ curl -X GET \
-H 'Content-Type: application/json' \
-H "Authorization: user_token q56hqkniwot8wntb3z1qarka5atf365taaa2uyjrn" \
-H "App-Token: f7g3csp8mgatg5ebc5elnazakw20i9fyev1qopya7" \
'http://path/to/glpi/apirest.php/initSession```

apache httpd において、ldap basic認証 + グループファイル認証 (AuthGroupFile)

するには、httpd.confを次のようにすれば、OKみたい。

<Location /group-only
   AuthType Basic
   AuthBasicProvider ldap
   SetHandler ldap-status
   AuthGroupFile /etc/httpd/passwd/groups
   AuthName "Sexy&Password"
   AuthLDAPURL ldap://ldap.example.co.jp/ou=people,o=sexy-group?uid
   require group sysfur
</Location>
sysfur: user1 user2 ... usern

MS ACCESSでのデータ入力時に、外部参照テーブルの値で補完 - ルックアップ機能

先程のエントリに関連するかも知れませんが、 MS ACCESSでのデータ入力時に、外部参照テーブルの値で補完したい場合、 デザインビューを開いて、ルックアップを設定すれば、OK

ポイントは、以下の赤線部分。

f:id:end0tknr:20190310172626p:plain

mysql の外部キー制約設定(FOREIGN KEY)でエラーなら、「SHOW ENGINE INNODB STATUS」でログを見ましょう

mysql> ALTER TABLE software ADD CONSTRAINT software_hw_name
    -> FOREIGN KEY (fk_hw_name) REFERENCES hardware (hw_name)
    -> ON DELETE SET NULL ON UPDATE CASCADE;
ERROR 1215 (HY000): Cannot add foreign key constraint

上記のようなエラーに出会ったら、ググるより、 「SHOW ENGINE INNODB STATUS」でmysqlのログを見る方が解決への近道です。

mysql> SHOW ENGINE INNODB STATUS\G
<略>
------------------------
LATEST FOREIGN KEY ERROR
------------------------
2019-03-08 10:01:35 7fe1f6294700 Error in foreign key constraint of table it_assets/#sql-cfa_4e4:

FOREIGN KEY (fk_hw_name) REFERENCES hardware (hw_name)
ON DELETE SET NULL ON UPDATE CASCADE:
Cannot find an index in the referenced table where the
referenced columns appear as the first columns, or column types
in the table and the referenced table do not match for constraint.
Note that the internal storage type of ENUM and SET changed in
tables created with >= InnoDB-4.1.12, and such columns in old tables
cannot be referenced by such columns in new tables.
See http://dev.mysql.com/doc/refman/5.6/en/innodb-foreign-key-constraints.html
for correct foreign key definition.

今回の場合、create indexを追加することで解消しています

re: エンジニアリング組織論への招待 ~ 不確実性に向き合う思考と組織のリファクタリング

gihyo.jp

読んでみた。「ブクログ大賞[2018] ビジネス書部門大賞」らしい。

分かりやすい。「上流工程はウォーターフォールよりスクラムかな?」と思った。

以下、自分なりのポイントを記載

「不確実性」とは、「未来」と「他人」から構成

                  不確実を確実にするものが情報
┌──┐        ┌────┐    :     ┌───┐
│不安│←───│不確実性│────→│確実性│
└──┘        └┬───┘          └───┘
  │              │  ┌───┐
  │              ├─┤未  来│─対策→ 行動と観察
  │              │  └┬──┘
  │              │    ├ 方法の不確実性
  │              │    └ 目的の不確実性
  │              │(他人が未来の不確実を増大させる)  
  │              │  ┌───┐
  └──────→└─┤他  人│─対策→ コミュニケーション
(不安が他人の不確実を └┬──┘
 増大させる)            ├ 他者理解の不確実性-人は他人や事象を完全には理解不可
                        ├ 伝達の不確実性 -   コミュニケーションが到達するとは限らない 
                        └ 成果の不確実性 -   理解されても行動するとは限らない

経験主義と仮設主義、設計主義

主義 説明
経験主義 情報を入手する為、まず、行動し、その結果観察から問題解決
仮説主義 限定された情報から全体像を想定し、それを確かめることで問題解決
設計主義 ウォーターフォール型。範囲後はスクラム型(経験主義)

不確実性コーンに対するプロとアマの取り組み順

プロ

不確実性の高い部分から取り組み、短い時間で一定の品質まで作成し、 残りの時間で細かい部分を作りこむ。(早い段階で、全体像が見える)

アマ

不確実性の低い部分から取り組む為、最終工程まで全体像が見えない。 (重要部分を後回しにしている為、終盤での問題発生時にリカバリー難)

品                    ┏━━━━
質            ┏━━━┛        │
↑            ┃↑プロ          │
│      ┏━━┛                │
│      ┃                      │
│      ┃                  ┌─┘
│  ┏━┛                  │
│  ┃                ┌──┘
│  ┃      ↓アマ│
│  ┃        ┌───┘
│    ────┘
└───────────────→時間

観察できないものは制御できない

一見、困難そうな問題であっても、 制御や観察できる部分と、それ以外に切り分け、制御や観察できる部分から取り組む。

アジャイル開発宣言 (従来との違い)

従来重視 アジャイルで重視
プロセスやツール 個人と対話
包括的なドキュメント 動くソフト
契約交渉 顧客との交渉
計画順守 変化への対応

その他

共感と同感の違い

私が「理解されたか」と「合意できたか」を使い分けていた点と同じですね。

事実と意見の違い

心理的安全

not パワハラ な状態が生産性を上げる

構成管理データベース(CMDB)

IT資産(ハードウェアやソフトウェア)を管理するDB table構成を考える - end0tknr's kipple - 新web写経開発

以前、上記のエントリを記載していますが、 世の中(ITIL)的には、構成管理データベース(CMDB)というものがあるらしい。

構成管理データベース(CMDB)の構築/改善 | アシスト

例えば、商用であれば、アシスト社の↑こういうものや OSSであれば、CMDBuild ↓ というプロダクトがあるそうです。

https://www.ospn.jp/osc2015.enterprise/pdf/osc2015.enterprise_cmdbuild_usergroup.pdf

以下、2019/2/28追記

インベントリ収集

  • open audit
  • OCS Inventory NG

構成管理DB

  • CMDBuild
  • GLPI
  • snipe-it