end0tknr's kipple - web写経開発

太宰府天満宮の狛犬って、妙にカワイイ

ldap3 for python による ldap 検索

次のようになると思います

#!/usr/local/bin/python
# -*- coding: utf-8 -*-

import sys
from ldap3 import *
#from ldap3 import Server, Connection, ALL, NTLM, ALL_ATTRIBUTES,
#                  ALL_OPERATIONAL_ATTRIBUTES, AUTO_BIND_NO_TLS, SUBTREE


def main():
    server = Server("ldap.ないしょ.co.jp", get_info=ALL)
    conn = Connection(server,
                      read_only=True,
                      auto_bind=True)
    # conn = Connection(server,
    #                   user='ないしょ',
    #                   password='ないしょ',
    #                   check_names=True,
    #                   read_only=True,
    #                   auto_bind=True)

    mail_addrs_file = sys.argv[1]

    in_f = open(mail_addrs_file, mode='r',encoding='utf-8')

    i = 0
    for line in in_f:
        i += 1
        print(i, file=sys.stderr)
        mail_addr = line.strip()

        if len(mail_addr) ==0:
            continue

        conn.search("ou=people,o=sexy-group",
                    "(mail=" + mail_addr + ")",
                    attributes = [ALL_ATTRIBUTES, ALL_OPERATIONAL_ATTRIBUTES],
                    # attributes=['cn', 'displayName', 'description'],
                    paged_size=1)

        if len(conn.entries) == 0:
            print(mail_addr)
            continue

        entry = conn.entries[0]

        disp_cols = [mail_addr]
        for atri_key in ["uid","cn","o","ou"]:
            if (atri_key in entry) ==True:
                disp_cols.append( str( entry[atri_key]) )
            else:
                disp_cols.append("")

        atri_key ="sexyIdCardDepartment"
        if (atri_key in entry) ==True:
            disp_cols.append( str( entry[atri_key][0]) )
        else:
            disp_cols.append("")


        print( "\t".join(disp_cols) )


    in_f.close()

        
if __name__ == '__main__':
    main()

ImageMagick の compare コマンドによる画像比較

DOS> compare.exe input_img_1.png input_img_2.png  diff_img.png

基本的な実行は上記の通りで、diff_img.png に差分が出力されます。

例えば、pythonから連続的に compareを実行する場合、次のようになると思います。

#!/usr/local/bin/python
# -*- coding: utf-8 -*-

import os
import sys
import subprocess
import time

conf = {"image_magick_compare":
        "c:/Users/end0t/tmp/ImageMagick-70/compare.exe"}

def main():
    if len(sys.argv) == 4:
        in_dir_1 = sys.argv[1]
        in_dir_2 = sys.argv[2]
        out_dir  = sys.argv[3]
    else:
        print("USAGE:",sys.argv[0],"IN_DIR_1 IN_DIR_2 OUT_DIR")
        return None

    i = 0
    for filename in os.listdir(in_dir_1):
        i += 1
        print(i, filename)
        cmd_line = " ".join([conf["image_magick_compare"],
                             in_dir_1 +"/"+ filename,
                             in_dir_2 +"/"+ filename,
                             out_dir +"/"+ filename ])

        result = subprocess.call(cmd_line)
        
if __name__ == '__main__':
    main()

以下、差分出力例。赤い部分が差異部分です

f:id:end0tknr:20200602082800p:plain

selenium for python + firefoxdriver で、page全体の画面キャプチャを連続取得

selenium for python + chromedriver で、page全体の画面キャプチャを連続取得 - end0tknr's kipple - web写経開発

先程のエントリの別バージョン。

chrome driverを動作させてみると、画面キャプチャ10枚程度で動作が止まってしまう...

原因不明ですが、firefoxdriver を書いてみたところ、上手く動作するみたい。

しかも、先程のように画面キャプチャ用browserの別プロセス化も不要。

こちらの方がよさそ

#!python
# -*- coding: utf-8 -*-

import getopt
import os
import pathvalidate
import re
import sys
from selenium import webdriver
from selenium.webdriver.support.ui import WebDriverWait
from selenium.webdriver.firefox.options import Options
import time


conf = {"geckodriver_path":
        os.getcwd() + "\\..\\selenium\\geckodriver.exe",
        "img_save_dir" : os.getcwd() }

def main():
    
    if len(sys.argv) == 3:
        req_domain = sys.argv[1]
        req_paths_file = sys.argv[2]
    else:
        print("USAGE:",sys.argv[0],"PROTOCOL_and_FQDN HTML_PATHS_FILE")
        return None
    # ブラウザを headlessモードで起動
    browser = init_browser()

    print( req_paths_file )
    
    req_paths = load_html_paths( req_paths_file )
    browser_tmp = None
    i = 0
    for req_path in req_paths:
        i += 1
        req_url = req_domain + "/" +req_path
        print(i, req_url)
        
        # 大きくしたwindowを後から小さくして、画面キャプチャすると
        # 大きい画像になるようなので、一旦、小さめ?に
        browser.set_window_size(980, 800)

        if http_get_url(browser, req_url, 5) == False:
            print("fail http_get_url()", req_url)
            sys.exit()

        # redirectにより全く別のsiteへ誘導される場合、pass
        result = re.match(req_domain, browser.current_url)
        if result == False:
            print("SKIP ! different host" + browser.current_url)
            continue

        # page全体を画面キャプチャする為、resize
        if set_window_size(browser, 5) == False:
            print("error set_window_size()")
            sys.exit()

        # 画面キャプチャ file保存先の算出
        req_path_tmp = re.sub('/', '_', req_path)
        req_path_tmp = pathvalidate.sanitize_filename(req_path_tmp)
        
        img_save_path = conf["img_save_dir"] + "/" + req_path_tmp + ".png"
        print( " save at " + img_save_path )
        
        # 画面キャプチャ file保存
        if save_screenshot(browser, img_save_path, 5) == False:
            print("error save_screenshot()")
            sys.exit()
        
    browser.close()


def save_screenshot(browser, img_save_path, max_retry):

    for _ in range(max_retry):
        try:
            browser.save_screenshot(img_save_path)
            return True
        except Exception as e:
            print("retry save_screenshot()")
    return False

def set_window_size(browser, max_retry):
    
    for _ in range(max_retry):
        try:
            size_w = \
                browser.execute_script("return document.body.scrollWidth;")
            size_h = \
                browser.execute_script("return document.body.scrollHeight;")
            browser.set_window_size(size_w, size_h)
            return True
        except Exception as e:
            print("retry set_window_size()")
            time.sleep(2)
    return False
            

def http_get_url(browser, req_url, max_retry):
    
    for _ in range(max_retry):
        try:
            browser.get( req_url )
            return True
        except Exception as e:
            print("http_get_url()", req_url)
            time.sleep(2)
    return False
    
    
def init_browser():
    profile = webdriver.FirefoxProfile()
    options = Options()
    options.headless = True

    browser = webdriver.Firefox(executable_path=conf["geckodriver_path"],
                                options=options,
                                firefox_profile=profile,
                                service_log_path=os.path.devnull)
    wait = WebDriverWait(browser, 20)
    browser.implicitly_wait(30)
    return browser


def load_html_paths( html_paths_file ):
    paths = []
    f = open(html_paths_file, mode='r')
    for line in f.readlines():
        paths.append( line.strip() )
    f.close()

    return paths

if __name__ == '__main__':
    main()

selenium for python + chromedriver で、page全体の画面キャプチャを連続取得

【Python】Seleniumでページ全体のスクリーンショット撮るならマルチプロセスで! - Qiita

上記に倣い、以下のように書くと、よさそう。

ポイントは、

  • 一旦、対象のurlへアクセス後、window sizeを取得
  • その後、別processの webdriverをwindow size指定で起動し、画面キャプチャ取得

ちなみに、以下は、python for win で動作させています

#!/usr/local/bin/python
# -*- coding: utf-8 -*-

import getopt
import os
import re
import sys
# http://chromedriver.chromium.org/getting-started
from selenium import webdriver
import time
import urllib
import urllib.request
import urllib.parse


conf = {"img_save_dir" : os.getcwd() + "\\IMG_TMP\\",
        "chrome_driver": os.getcwd() + '\\chromedriver.exe',
        "chrome_options" : ["--headless",
                            "--enable-logging=False",
                            #以下、3行はSSLエラー対策らしい
                            "--ignore-certificate-errors",
                            "--disable-extensions",
                            "--disable-print-preview"]}

def main():
    
    if len(sys.argv) == 3:
        req_domain = sys.argv[1]
        req_paths_file = sys.argv[2]
    else:
        print("USAGE:",sys.argv[0],"PROTOCOL_and_FQDN HTML_PATHS_FILE")
        return None

    browser = init_browser()
    
    req_paths = load_html_paths( req_paths_file )
    i = 0
    for req_path in req_paths:
        i += 1
        req_url = req_domain + req_path
        print(i, req_url)
        
        # 必要に応じ、以下を comment or un-comment
        req_url = req_url.replace('.cgi.html','.cgi')

        # 一旦、対象のurlへアクセス後、window sizeを取得し
        # 別processの webdriverで画面キャプチャ取得
        browser.get( req_url )
        size_w = browser.execute_script("return document.body.scrollWidth;")
        size_h = browser.execute_script("return document.body.scrollHeight;")
        # browser.set_window_size(1024,h)

        # 画面キャプチャ file保存先の算出
        req_path_tmp = re.sub('^/', '', req_path)
        req_path_tmp = re.sub('/', '_', req_path_tmp)
        img_save_path = conf["img_save_dir"] + req_path_tmp + ".png"

        browser_tmp = init_browser_for_screenshot(size_w, size_h)
        
        browser_tmp.get( req_url )
        browser_tmp.save_screenshot(img_save_path)
        browser_tmp.close()
        
#        if i > 5:
#            break

    browser.close()


def init_browser():
    chopt = webdriver.ChromeOptions()
    
    for option_tmp in conf["chrome_options"]:
        chopt.add_argument( option_tmp )

    browser = webdriver.Chrome(options = chopt,
                               executable_path=conf["chrome_driver"])
    return browser

def init_browser_for_screenshot(size_w,size_h):
    chopt = webdriver.ChromeOptions()

    for option_tmp in conf["chrome_options"]:
        chopt.add_argument( option_tmp )
    chopt.add_argument("--window-size="+str(size_w)+","+str(size_h))

    browser = webdriver.Chrome(options = chopt,
                               executable_path=conf["chrome_driver"])
    return browser


def load_html_paths( html_paths_file ):

    paths = []
    f = open(html_paths_file, mode='r',encoding='utf-8')
    for line in f:
        pref_city = line.split()
        paths.append( line.strip() )
    f.close()

    return paths


if __name__ == '__main__':
    main()

wget for linux でサイトをクローリング(スクレイピング?)する際の自分流オプション

おおよそ、次のようなオプションでdownloadすることで、 localにサイトのクローンを作成できてきます。

最近の世の中には、サイトクロールを行う高機能?なツールも存在すると思いますが、 wgetも十分すぎる程、高機能で、以下の他にも大量のoptionがあります

$ wget --version
  GNU Wget 1.19.5 built on linux-gnu.
$ nohup \
    wget
      --mirror                   \ = --recursive & --level inf & -–timestamping 
      --page-requisites          \ pageが使用する画像,css,jsもdownload
      --no-clobber               \ download済fileを上書きせず、別名で保存
      --restrict-file-names=unix \ 日本語file名の文字化け防止 [unix|windows]
      --convert-links            \ localのfileでも閲覧できるよう相対path化
      --adjust-extension         \ .htmlがない場合の拡張子付与や?パラメータ削除
      --random-wait              \
      --no-parent                \
      --no-host-directories      \
      --quiet --show-progress    \ tail -f で進捗を眺める際、適度な情報量
      --execute robots=off       \ 
      www.ないしょ.com &

「--adjust-extension」を使用する場合、wgetの処理完了までの間、 file名が「RGPINH~2」のようなrandomな名称になっている気がします。

情報銀行 - 情報信託機能の認定スキームの在り方に関する検討会

情報銀行」って、その単語自体は分かりやすいのですが、何よりユースケースが思い浮かばない。

総務省の文書を読み返してみましたが、やっぱり理解できない。

ブロックチェーン同様、流行り言葉に向かう気がします。

本エントリと直接の関係はありませんが、 欧州の GDPR (General Data Protection Regulation:一般データ保護規則) は、「GDPR」の用語を忘れるのでメモしておきます。

urllib.request for python における proxy 経由での http get

import urllib.request as req

proxy = req.ProxyHandler({'http': r'$user_id:$user_pw@proxy_host:80'})
auth = req.HTTPBasicAuthHandler()
opener = req.build_opener(proxy, auth, req.HTTPHandler)
req.install_opener(opener)
conn = req.urlopen('https://www.yahoo.co.jp')
return_str = conn.read()
print( return_str )

python で smb 接続し、dir以下を再帰探索

以下のように書くと、よさそう

#!/usr/local/bin/python
# -*- coding: utf-8 -*-

import datetime
import os
import sys
import platform
from smb.SMBConnection import SMBConnection
import time

conf = {"user_id":"ないしょ",
        "user_pw":"ないしょ",
        "remote_netbios":'CBBないしょ4252',
        "remote_ip":"ないしょ",
#        "remote_port":139,
        "remote_port":445,      # tera station?に対しては
        "is_direct_tcp": True,  #ここがTrue & port445がよさそう
        "remote_path":"ファイルサーバー",
        "sleep": 0.2}

def main():
    smb_conn = SMBConnection(conf["user_id"],
                             conf["user_pw"],
                             platform.uname().node, # client netbios
                             conf["remote_netbios"],
                             is_direct_tcp=conf["is_direct_tcp"])
    try:
        smb_conn.connect(conf["remote_ip"],conf["remote_port"])
    except Exception as e:
        print('Connect failed. Reason: %s', e)
        return False

    start_dir = ""
    if len(sys.argv) == 2:
        start_dir = sys.argv[1]
    else:
        print("USAGE:",sys.argv[0],"start_dir")
        return None

    files_summary = {}
    aggregate_dir( smb_conn, start_dir, files_summary)
    
    smb_conn.close()

    sorted_summary = sorted(files_summary.items(), key=lambda x:x[0])
    for summary in sorted_summary:
        yyyy,file_type = summary[0].split("\t")
        disp_str = "\t".join([str(yyyy),
                              file_type,
                              str(summary[1]["byte"]),
                              str(summary[1]["count"]) ])
        print( disp_str)


def aggregate_dir( smb_conn, org_dir, files_summary ):
    print("aggregating ...", org_dir)
    time.sleep(conf["sleep"])
    
    dir_or_files = smb_conn.listPath(conf["remote_path"],org_dir)

    for dir_or_file in dir_or_files:
        if dir_or_file.filename=="." or dir_or_file.filename=="..":
            continue
        
        if dir_or_file.isDirectory:
            next_dir = org_dir +"/"+ dir_or_file.filename
            aggregate_dir( smb_conn, next_dir, files_summary)
            continue

        last_unix_time = dir_or_file.last_write_time
        if last_unix_time < dir_or_file.last_access_time:
            last_unix_time = dir_or_file.last_access_time
            
        atime = date_str_from_unixtime(last_unix_time)
        file_ext = dir_or_file.filename.split(".")[-1].upper()
        summary_key = atime +"\t"+file_ext
        
        if (summary_key in files_summary) == False:
            files_summary[summary_key] = {"byte":0, "count":0}

        files_summary[summary_key]["count"] += 1
        files_summary[summary_key]["byte"]  += dir_or_file.file_size

        
def date_str_from_unixtime(org_val):
    dt = datetime.datetime.fromtimestamp(org_val)
#    print(dt.strftime('%Y-%m-%d %H:%M:%S'))
    return dt.strftime('%Y')
    
if __name__ == '__main__':
    main()

install modsecurity ver.2.9.3 (FOSS WAF) from source to apache 2.4 + centos8

ファイアウォール系の仕組みは、実運用に向けたルール選定や設定が非常に難しい。

特にWAFは単純導入だけでは、検知できないケースがあるだけでなく、過検知によりサービス不能に陥る。

2010年のIPAによる「オープンソースWAF「ModSecurity」導入事例 ~ IPA はこう考えた ~」公開も こういった背景があるのかと思います。

ただ、全く触ったこともないと、今後の議論や検討を継続できない為、以下、手習いメモ。

参考URL

install mod security

$ wget https://www.modsecurity.org/tarball/2.9.3/modsecurity-2.9.3.tar.gz
$ tar -xvf modsecurity-2.9.3.tar.gz
$ cd modsecurity-2.9.3
$ ./configure --prefix=/home/end0tknr/local/modsecurity \
              --with-apxs=/home/end0tknr/local/apache/bin/apxs \
              --with-apr=/home/end0tknr/local/apache/bin/apr-1-config \
              --with-apu=/home/end0tknr/local/apache/bin/apu-1-config
$ make
$ make check
$ make install 

$ cp modsecurity.conf-recommended \
     /home/end0tknr/local/apache/conf/extra/modsecurity.conf
$ cp unicode.mapping /home/end0tknr/local/apache/conf/extra/ ※1

※1 以下のようなerrorとなる為

$ ./bin/apachectl start
AH00526: Syntax error on line 219 of apache/conf/extra/modsecurity.conf:
Could not open unicode map file "apache/conf/extra/unicode.mapping"

install OWASP ModSecurity CRS(Core Rule Set)

こちらは、ダウンロード&解凍のみ

$ cd /home/end0tknr/local/apache/conf
$ wget https://github.com/SpiderLabs/owasp-modsecurity-crs/archive/v3.2.0.tar.gz
$ tar -xvf v3.2.0.tar.gz
$ ln -s owasp-modsecurity-crs-3.2.0 modsecurity
$ cp modsecurity/crs-setup.conf.example modsecurity/crs-setup.conf

config apache and mod_security

$ vi /home/end0tknr/local/apache/conf/httpd.conf
LoadModule unique_id_module modules/mod_unique_id.so
LoadModule security2_module modules/mod_security2.so

<IfModule security2_module>
Include conf/extra/modsecurity.conf
</IfModule>
$ vi /home/end0tknr/local/apache/conf/extra/modsecurity.conf
old) /var/log/modsec_audit.log
new) logs/modsec_audit.log

old) #SecDebugLog /opt/modsecurity/var/log/debug.log
old) #SecDebugLogLevel 3
new) SecDebugLog logs/modsec_debug.log
new) SecDebugLogLevel 3

old) SecPcreMatchLimit 1000
old) SecPcreMatchLimitRecursion 1000
new) SecPcreMatchLimit 5000000
new) SecPcreMatchLimitRecursion 5000000 ※2

add) Include conf/modsecurity/crs-setup.conf 
add) Include conf/modsecurity/rules/*.conf ※3

※2 default値が小さく、以下のように error_log に「Execution error - PCRE limits exceeded (-8)」と表示された為

[:error] [pid 10784:tid 139973680060160] [client 192.168.63.1:42265] [client 192.168.63.1]
  ModSecurity: Rule 17ba660 [id "-"]
  [file "/home/end0tknr/local/apache/conf/modsecurity/rules/RESPONSE-951-DATA-LEAKAGES-SQL.conf"]
  [line "342"] - Execution error - PCRE limits exceeded (-8): (null). [hostname "cent80.a5.jp"]
  [uri "/Test/test.php"] [unique_id "Xsl37TWWTWnMNiW9xIdZDAAAAIQ"]```

※3 採用するルールは厳選が必要です


# 動作確認

modsecurity.conf で「SecRuleEngine DetectionOnly→On」と設定し、
「http://cent80.a5.jp:8080/test.php?union+select」のようにアクセスし、
「403 Forbidden」と表示されれば、modsecurityは動作しています。

install clamav-0.102.3 from src to centos 8

過去、数回installしていますが、これまでのメモが不十分でしたので、再度、お試し

参考url

install

主に https://clamav-jp.osdn.jp/jdoc/clamav.html の記載の通りです。

$ sudo groupadd clamav
$ sudo useradd -g clamav -s /bin/false -c "Clam Antivirus" clamav
$ sudo yum install gmp
$ wget https://www.clamav.net/downloads/production/clamav-0.102.3.tar.gz
$ tar -xvf clamav-0.102.3.tar.gz
$ ./configure
  :
configure: Summary of detected features follows
              OS          : linux-gnu
              pthreads    : yes (-lpthread)
configure: Summary of miscellaneous features
              check       : no (auto)
              fanotify    : yes
              fdpassing   : 1
              IPv6        : yes
              openssl     : /usr
              libcurl     : /usr/local
configure: Summary of optional tools
              clamdtop    : yes (-lncurses)
              milter      : no (missing libmilter) (disabled)
              clamsubmit  : no (missing libjson-c-dev. Use the website to submit FPs/FNs.) (disabled)
              clamonacc   : yes (auto)
configure: Summary of engine performance features
              release mode: yes
              llvm        : no (disabled)
              mempool     : yes
configure: Summary of engine detection features
              iconv       : yes
              bzip2       : ok
              zlib        : yes (from system)
              unrar       : yes
              preclass    : no (missing libjson-c-dev) (disabled)
              pcre        : /usr/local
              libmspack   : yes (Internal)
              libxml2     : yes, from /usr/local
              yara        : yes
              fts         : yes (libc)
$ make
$ make check
$ sudo make install 

virus 定期 databaseの作成

$ sudo /usr/local/bin/freshclam
ERROR: Can't open/parse the config file /usr/local/etc/freshclam.conf

$ sudo cp ~/tmp/clamav-0.102.3/etc/freshclam.conf.sample /usr/local/etc/freshclam.conf

が、freshclam.conf 内に「Example」という記述があったので、コメント化

$ sudo /usr/local/bin/freshclam
ERROR: Please edit the example config file /usr/local/etc/freshclam.conf
ERROR: Can't open/parse the config file /usr/local/etc/freshclam.conf

$ sudo vi /usr/local/etc/freshclam.conf

  # Comment or remove the line below.
  # Example ←ココをコメント化

更に、virus定義file 用のdirがない為、mkdir

$ sudo /usr/local/bin/freshclam
ERROR: Database directory does not exist: /usr/local/share/clamav/
ERROR: initialize: libfreshclam init failed.
ERROR: Initialization error!

$ sudo mkdir /usr/local/share/clamav

更にx2、ユーザ(clamav)への書込み権限が必要らしく、chown

$ sudo /usr/local/bin/freshclam
ClamAV update process started at Sat May 23 10:54:10 2020
ERROR: Can't create temporary directory /usr/local/share/clamav/tmp.bbd17
Hint: The database directory must be writable for UID 1005 or GID 1007
ERROR: Update failed.

$ sudo chown clamav:clamav /usr/local/share/clamav
$ ls -l /usr/local/share
   :
drwxr-xr-x   2 clamav clamav    6 May 23 10:54 clamav
$

で、やっと成功。

$ sudo /usr/local/bin/freshclam
ClamAV update process started at Sat May 23 11:00:01 2020
daily database available for download (remote version: 25820)
Time: 17.6s, ETA: 0.0s [=============================>] 63.14MiB/63.14MiB        
Testing database: '/usr/local/share/clamav/tmp.3cc97/clamav-f27aa8b7c8f1244ca8cb7be72f9f37a1.tmp-daily.cvd' ...
Database test passed.
daily.cvd updated (version: 25820, sigs: 2462534, f-level: 63, builder: raynman)
main database available for download (remote version: 59)
Time: 26.4s, ETA: 0.0s [=============================>] 112.40MiB/112.40MiB       
Testing database: '/usr/local/share/clamav/tmp.3cc97/clamav-1197b7466f4ea80d0831b55e85bcab64.tmp-main.cvd' ...
Database test passed.
main.cvd updated (version: 59, sigs: 4564902, f-level: 60, builder: sigmgr)
bytecode database available for download (remote version: 331)
Time: 5.3s, ETA: 0.0s [=============================>] 289.44KiB/289.44KiB      
Testing database: '/usr/local/share/clamav/tmp.3cc97/clamav-759c07fa126e9bbd634636a0e7770777.tmp-bytecode.cvd' ...
Database test passed.
bytecode.cvd updated (version: 331, sigs: 94, f-level: 63, builder: anvilleg)

clamd (daemon)の起動

設定fileのcopy.

$ sudo cp ~/tmp/clamav-0.102.3/etc/clamd.conf.sample /usr/local/etc/clamd.conf

$ sudo vi /usr/local/etc/clamd.conf

※ freshclam.conf と同様、「Example」という記述があったので、コメント化
# Comment or remove the line below.
# Example

※clamd起動時に「Please define server type (local and/or TCP)」となる為、
  以下3行を非コメント化
FixStaleSocket yes
TCPSocket 3310
TCPAddr 127.0.0.1

自動起動 for systemd の設定

$ sudo cp ~/tmp/clamav-0.102.3/clamd/clamav-daemon.service /etc/systemd/system/
Created symlink /etc/systemd/system/multi-user.target.wants/clamav-daemon.service
  → /etc/systemd/system/clamav-daemon.service.
Created symlink /etc/systemd/system/sockets.target.wants/clamav-daemon.socket
  → /usr/lib/systemd/system/clamav-daemon.socket.

$ sudo systemctl start  clamav-daemon.service
$ sudo systemctl status clamav-daemon.service
● clamav-daemon.service - Clam AntiVirus userspace daemon
   Loaded: loaded (/etc/systemd/system/clamav-daemon.service; enabled; vendor preset: disabled)
   Active: active (running) since Sat 2020-05-23 11:26:14 JST; 2s ago
     Docs: man:clamd(8)
           man:clamd.conf(5)
           https://www.clamav.net/documents/
 Main PID: 9398 (clamd)
    Tasks: 1 (limit: 24004)
   Memory: 182.4M
   CGroup: /system.slice/clamav-daemon.service
           └─9398 /usr/local/sbin/clamd --foreground=true

clamdscan によるvirus scan

www.eicar.org によるテストfileを利用します

$ wget http://www.eicar.org/download/eicar.com
$ wget http://www.eicar.org/download/eicar.com.txt
$ wget http://www.eicar.org/download/eicar_com.zip
$ wget http://www.eicar.org/download/eicarcom2.zip

## virusありの場合
$ /usr/local/bin/clamdscan -i eicar.com
/home/end0tknr/tmp/CLAM_AV/eicar.com: Win.Test.EICAR_HDB-1 FOUND

----------- SCAN SUMMARY -----------
Infected files: 1
Time: 0.002 sec (0 m 0 s)

## virusなしの場合
[end0tknr@cent80 CLAM_AV]$ /usr/local/bin/clamdscan -i foo.txt 

----------- SCAN SUMMARY -----------
Infected files: 0
Time: 0.001 sec (0 m 0 s)

## clamdが起動していない等、errorの場合
$ /usr/local/bin/clamdscan -i eicar.com
ERROR: Could not connect to clamd on 127.0.0.1: Connection refused

----------- SCAN SUMMARY -----------
Infected files: 0
Total errors: 1
Time: 0.000 sec (0 m 0 s)

IISへのSSL証明書登録には、linuxで使用する公開鍵(PEM)形式でなくPKCS#12(pfx)形式で

openssl による PKCS#12(pfx)形式への変換

秘密鍵も用意した上で、以下のopensslコマンドで変換できます。

$ openssl pkcs12 -export -inkey private.key -in ssl.crt -out ssl.pfx
Enter Export Password:
Verifying - Enter Export Password:

IISサーバへの登録手順

以下は、IISサーバでのSSL証明書更新の経験がない、自分用メモ

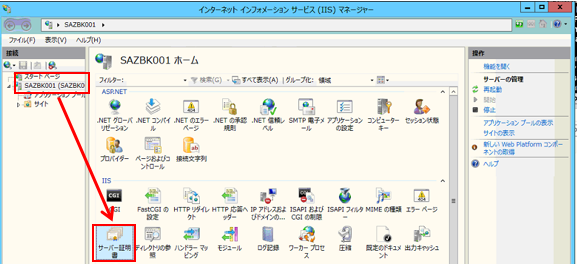
  • 「管理ツール」から「IISマネージャー」を開き、
  • 更に「サーバー証明書」画面から「インポート」ダイアログを開き、
  • SSL証明書(pfx形式)を指定

f:id:end0tknr:20200520151732p:plain

f:id:end0tknr:20200520151745p:plain

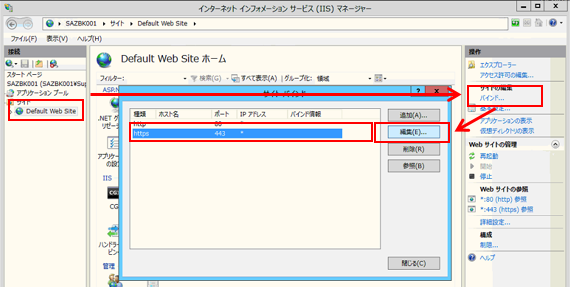
  • 「サイト」から「バインド」ダイアログを開き、
  • httpsの「編集」から、先程インポートしたSSL証明書を選択し完了

IIS再起動も不要

f:id:end0tknr:20200520151755p:plain

Google Maps Platform Directions API + python による道路距離計測

以下を参考に、python による http request の練習

cloud.google.com

qiita.com

で、以下の通り

#!/usr/local/bin/python
# -*- coding: utf-8 -*-
import json
import urllib
import urllib.request
import urllib.parse
import sys

conf = \
    {"req_url" : "https://maps.googleapis.com/maps/api/directions/json",
     "req_opts": {"mode": "driving",
                  "avoid":"tolls|highways"},
#                  "avoid":"tolls|highways|ferries"},
     "api_key" : "ないしょ"}
origins = ["北海道札幌市北区北6条西4丁目",       #札幌駅
           "宮城県仙台市青葉区中央一丁目",       #仙台駅
           "東京都渋谷区道玄坂一丁目",            #渋谷駅
       "愛知県名古屋市中村区名駅1丁目1−4",#名古屋駅
           "大阪市北区芝田一丁目1番2号",         #大阪梅田駅
           "広島県広島市南区松原町2番37号",   #広島駅
           "福岡県福岡市博多区博多駅中央街1−1",#博多駅
           ]


def main():

    pref_cities = load_destinations( sys.argv[1] )
    
    # 出力先fileのopen
    out_f = open("distances.txt", 'w', encoding='utf-8', errors='replace')
    
    for to_pref_city in pref_cities:
        print("\t".join(to_pref_city))
        distances = to_pref_city
        for from_address in origins:
            if len(to_pref_city)<2 or not to_pref_city[1]:
                distances.append("")
            else:
                distance = calc_road_distance(from_address,to_pref_city)
                distances.append(str(distance))
        print("\t".join(distances), file=out_f)
        
    out_f.close()


def load_destinations(destinations_file):

    pref_cities = []
    f = open(destinations_file, mode='r',encoding='utf-8')
    for line in f:
        pref_city = line.split()
        pref_cities.append(pref_city)
    f.close()

    return pref_cities

def calc_road_distance(from_address,to_pref_city):
            
    req_params = conf["req_opts"]
    req_params["origin"] = from_address
    req_params["destination"] =  to_pref_city[0]+""+to_pref_city[1]
    req_params_str = urllib.parse.urlencode(req_params)
    req_url_0 = conf["req_url"] +"?"+ req_params_str
    req_url   = req_url_0 + "&key=" + conf["api_key"]

    req = urllib.request.Request(req_url)
    try:
        res = urllib.request.urlopen(req)
        # requestsモジュールでは、接続と読込両方のtimeout設定可のよう
        # https://blog.cosnomi.com/posts/1259/
#    except (urllib.error.HTTPError, urllib.error.URLError) as err:
    except urllib.error.HTTPError as err:
        print(err.code, req_url_0)
        return None
    except urllib.error.URLError as err:
        print(err.reason, req_url_0)
        return None
    except:
        print("unknown error", req_url_0)
        return None

    content_str = res.read()
    res.close()
    
    content = json.loads(content_str)
    if content['status'] != "OK":
        return None

    # 複数の経路が得られる場合がある為、最短距離を返す
    distances = []
    for routes in content['routes']:
        for legs in routes['legs']:
            distances.append(legs['distance']['value'])
    distance = sorted(distances)
    return distance[0]

            
if __name__ == '__main__':
    main()

国交省 - 新型コロナウイルス感染症対策のため、暫定的な措置として、建築士法に基づく重要事項説明について、対面ではない、ITを活用した実施が可能となりました

「暫定」といっても、もとの「対面説明」に戻すのは難しいと思います

www.mlit.go.jp

social-app-django for pytho による google oauth ログイン (social login/auth)

https://nmomos.com/tips/2019/07/05/django-social-auth/

google の oauth を使用したログインを実現する為、 上記urlの google 関連部分を写経。

TODO

参考url

Step1: python仮想環境作成と auth-app-django の install や django project 作成

## 仮想環境 作成
$ cd ~/dev/
$ python3 -m venv venv_social_auth

## 仮想環境 有効化
$ cd venv_social_auth
$ source ./bin/activate

## django や social-auth-app-django の install
$ pip install django==2.2
$ pip install social-auth-app-django

## django project 作成.
## (通常、djangoでは config dir名 = project名となる為
##  一度、config の名前でproject を作成し、後でdir名を変更)
$ django-admin startproject config
$ mv config social_auth

※「python manage.py startapp ~」のように通常、project内に アプリを作成しますが、今回は極小規模ですので、これを行いません。

Step2: auth-app-django install 後の設定

$ vi config/setting.py
ALLOWED_HOSTS = ['*']                                              ## CHANGE

INSTALLED_APPS = [
    'django.contrib.admin',
    'django.contrib.auth',
    'django.contrib.contenttypes',
    'django.contrib.sessions',
    'django.contrib.messages',
    'django.contrib.staticfiles',

    'social_django',                                           ## ADD
]

MIDDLEWARE = [
    'django.middleware.security.SecurityMiddleware',
    'django.contrib.sessions.middleware.SessionMiddleware',
    'django.middleware.common.CommonMiddleware',
    'django.middleware.csrf.CsrfViewMiddleware',
    'django.contrib.auth.middleware.AuthenticationMiddleware',
    'django.contrib.messages.middleware.MessageMiddleware',
    'django.middleware.clickjacking.XFrameOptionsMiddleware',

    'social_django.middleware.SocialAuthExceptionMiddleware',     ## ADD
]

TEMPLATES = [
    {
        'BACKEND': 'django.template.backends.django.DjangoTemplates',
        'DIRS': [os.path.join(BASE_DIR, 'templates')],            ## CHANGE
        'APP_DIRS': True,
        'OPTIONS': {
            'context_processors': [
                'django.template.context_processors.debug',
                'django.template.context_processors.request',
                'django.contrib.auth.context_processors.auth',
                'django.contrib.messages.context_processors.messages',

                'social_django.context_processors.backends',       ## ADD
                'social_django.context_processors.login_redirect', ## ADD
            ],
        },
    },
]

AUTHENTICATION_BACKENDS = (                         ## ADD
    'social_core.backends.open_id.OpenIdAuth',      ## ADD
    'social_core.backends.google.GoogleOpenId',     ## ADD
    'social_core.backends.google.GoogleOAuth2',     ## ADD

    'social_core.backends.github.GithubOAuth2',     ## ADD
    'social_core.backends.twitter.TwitterOAuth',    ## ADD
    'social_core.backends.facebook.FacebookOAuth2', ## ADD

    'django.contrib.auth.backends.ModelBackend',    ## ADD
)                                                   ## ADD


LOGIN_URL          = 'login'                        ## ADD
LOGIN_REDIRECT_URL = 'home'                         ## ADD
$ vi config/urls.py

from django.conf.urls import include                ## ADD
from django.contrib.auth import views as auth_views ## ADD
from . import views                                 ## ADD

urlpatterns = [
    path('admin/', admin.site.urls),

    path('', views.index, name='index'),                               ## ADD
    path('login/', auth_views.LoginView.as_view(), name='login'),      ## ADD
    path('logout/', auth_views.LogoutView.as_view(), name='logout'),   ## ADD
    path('oauth/', include('social_django.urls', namespace='social')), ## ADD
    path('accounts/profile/', views.index, name='index')               ## ADD
]

Step3: auth-app-django install 後の db migrate

social-app-django は migrate 情報を持っている為、 事前の「python manage.py makemigrations」実行は不要です

$ python manage.py migrate

Step4: Goolge Developers Console で クライアント ID/シークレット取得

以降では、Googleのproject作成後における認証情報設定等について記載します。

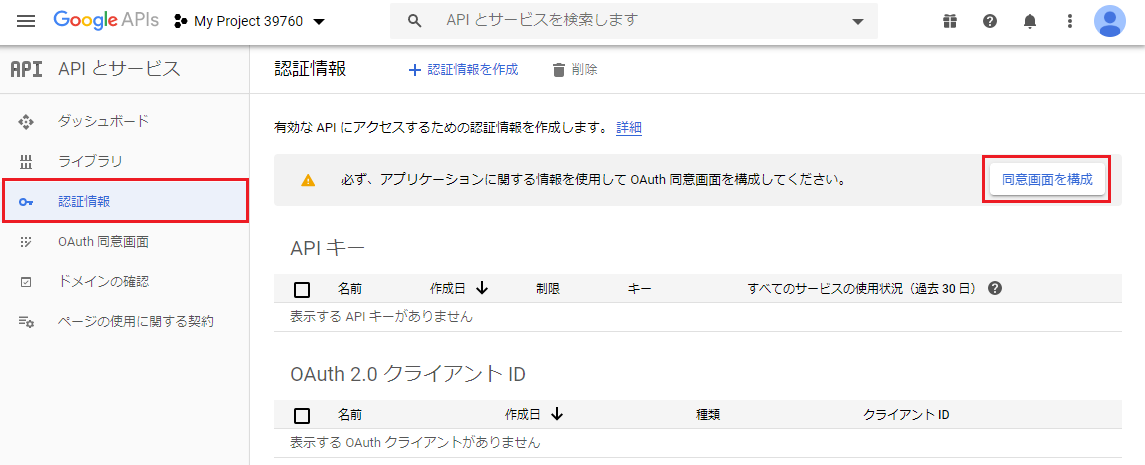
まず、画面左上にある「Google APIs」をクリックし、 画面左にメニューペインを表示

f:id:end0tknr:20200508083357p:plain

「認証情報」→「同意画面を構成」をクリック

f:id:end0tknr:20200508083407p:plain

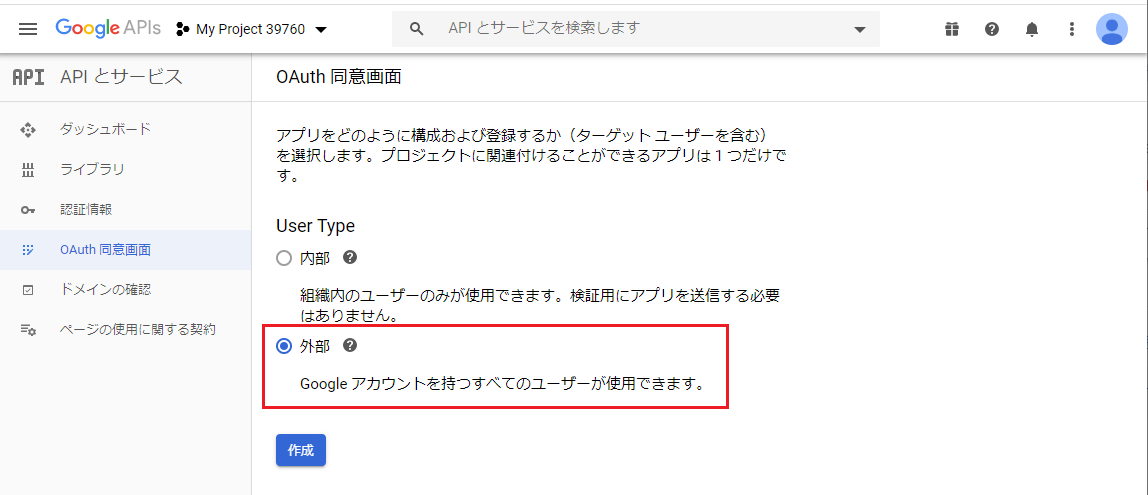
「OAuth同意画面」の「User Type」で「外部」を選択

f:id:end0tknr:20200508083422p:plain

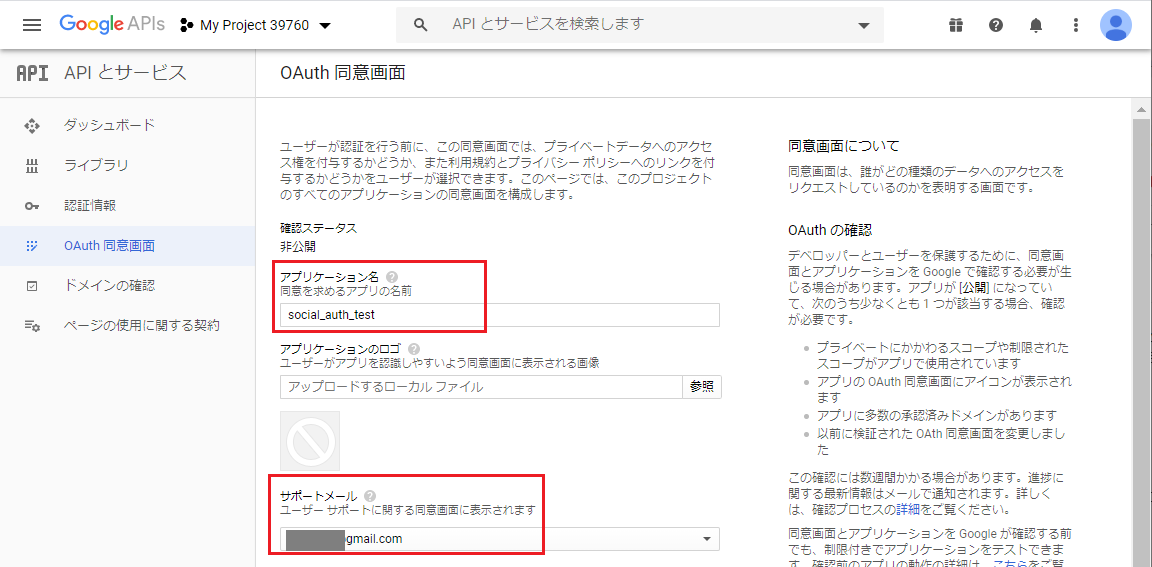
「OAuth同意画面」の「アプリケーション名」を入力。 (サポートメールは入力不要かもしれません)
f:id:end0tknr:20200508083431p:plain

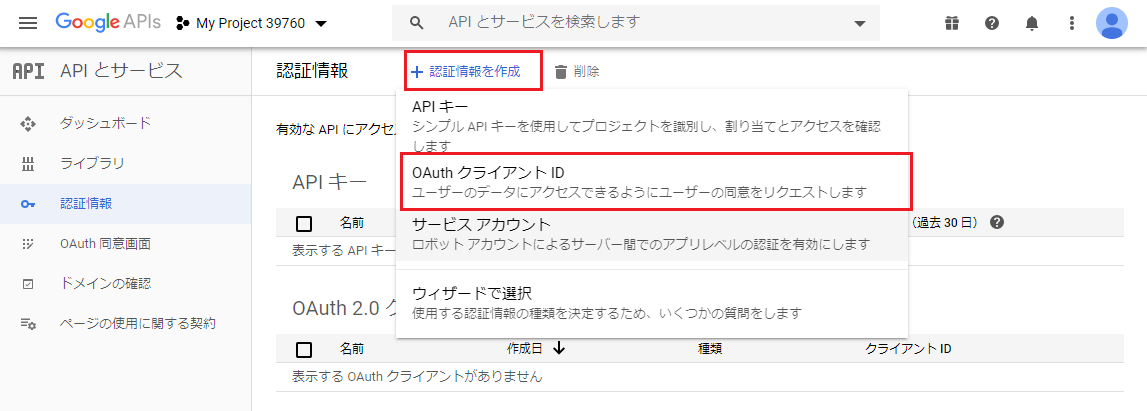
「認証情報を作成」→「OAuthクライアントID」をクリック

f:id:end0tknr:20200508083442p:plain

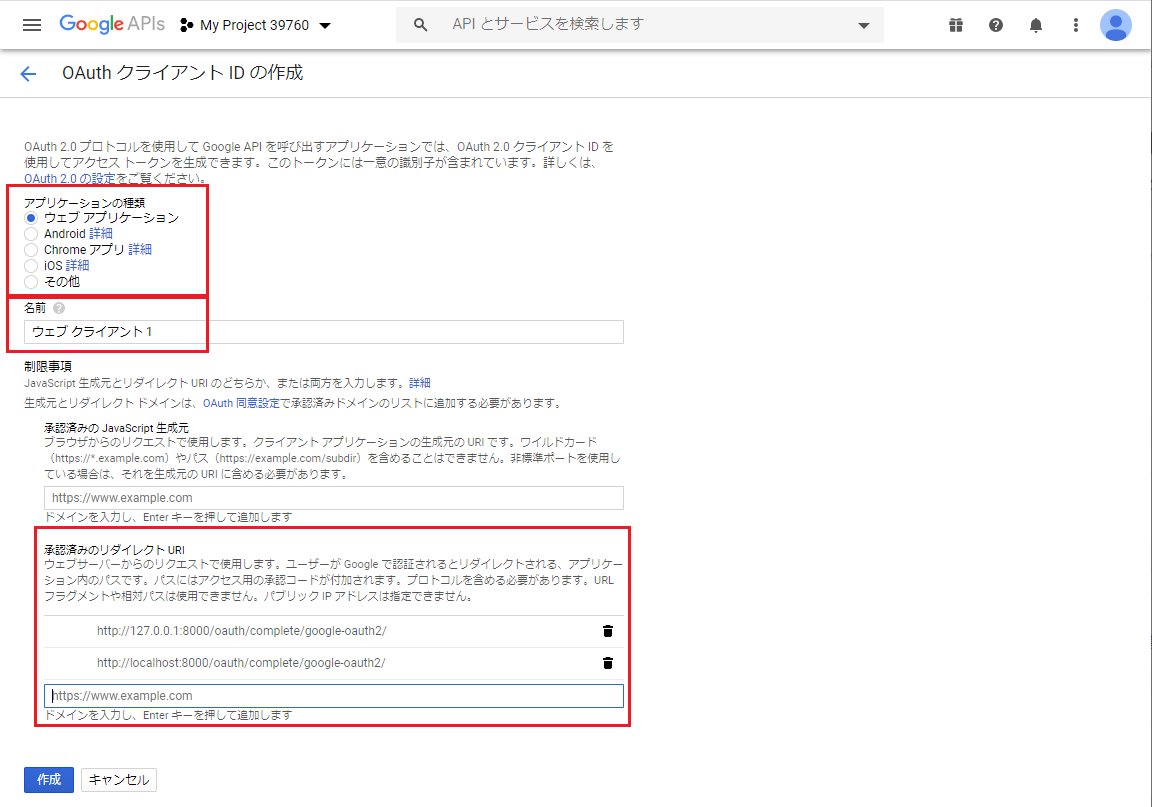
「OAuthクライアントの作成」において 「アプリケーションの種類」「名前」「承認済のリダイレクトURL」を入力
f:id:end0tknr:20200508083451p:plain

※私の場合、VirturlBox内のcentos8で動作させていることもあり 「承認済のリダイレクトURL」には以下を入力しています。

以上で、クライアント ID とシークレットが発行される為、 これを config/setting.py へ登録

$ vi config/setting.py

SOCIAL_AUTH_GOOGLE_OAUTH2_KEY    = 'ないしょ' ## ADD
SOCIAL_AUTH_GOOGLE_OAUTH2_SECRET = 'ないしょ' ## ADD

Step5: view や template の作成

$ vi config/views.py ## NEW FILE

from django.shortcuts import render

def index(request):
    return render(request, 'index.html')

htmlテンプレートは、以下のurlにあるものをそのままcopyしました。

https://github.com/mila411/django-social-auth

Step6: django の起動と動作確認

最後に以下でdjango を起動すれば、ブラウザで動作確認可能です。

$ python manage.py runserver 0.0.0.0:8080