pythonによる GA(Genetic Algorithm、遺伝的アルゴリズム) - end0tknr's kipple - web写経開発
先程のentryにあるGAとは別に、今度は、GPを以下のurlから写経します
真の関数である
と出力する値が等しい式(木構造 )を探索します。
from statistics import mean
from copy import deepcopy
import graphviz
import matplotlib.pyplot as plt
import random
import sys
POP_SIZE = 60
MIN_DEPTH = 2
MAX_DEPTH = 5
GENERATIONS = 250
TOURNAMENT_SIZE = 5
XO_RATE = 0.8
PROB_MUTATION = 0.2
def target_func (x):
return x**4 + x**3 + x**2 + x + 1
def add (x, y): return x + y
def sub (x, y): return x - y
def mul (x, y): return x * y
FUNCTIONS = [add, sub, mul]
TERMINALS = ['x' , -2 , -1 , 0 , 1 , 2 ]
def main ():
random.seed()
target_dataset = make_target_dataset()
population= init_population(POP_SIZE, MAX_DEPTH)
best_of_run = None
best_of_run_f = 0
best_of_run_gen = 0
fitnesses = []
for i in range (POP_SIZE):
fitnesses.append( fitness(population[i], target_dataset) )
average_f = []
max_f = []
gen_l = []
for gen in range (GENERATIONS):
gen_l.append(gen + 1 )
nextgen_population=[]
for i in range (POP_SIZE):
parent1 = selection(population, fitnesses)
parent2 = selection(population, fitnesses)
parent1.crossover(parent2)
parent1.mutation()
nextgen_population.append(parent1)
population=nextgen_population
fitnesses = []
for i in range (POP_SIZE):
fitnesses.append( fitness(population[i], target_dataset) )
average_f.append(sum (fitnesses) / len (fitnesses))
max_f.append(max (fitnesses))
if max (fitnesses) > best_of_run_f:
best_of_run_f = max (fitnesses)
best_of_run_gen = gen
best_of_run = deepcopy(population[fitnesses.index(max (fitnesses))])
print ("gen:" , gen,
"best_of_run_f:" , round (max (fitnesses),3 ))
best_of_run.print_tree()
if best_of_run_f == 1 : break
print ("END OF RUN" )
print ("best_of_run attained at gen:" , best_of_run_gen,
" fitness:" , round (best_of_run_f,3 ) )
best_of_run.print_tree()
best_of_run.draw_tree(
"best_of_run" ,
"gen:" + str (best_of_run_gen) + \
"has f:" + str (round (best_of_run_f,3 )) )
print ("len(gen_l):" ,len (gen_l),"len(max_f):" ,len (max_f) )
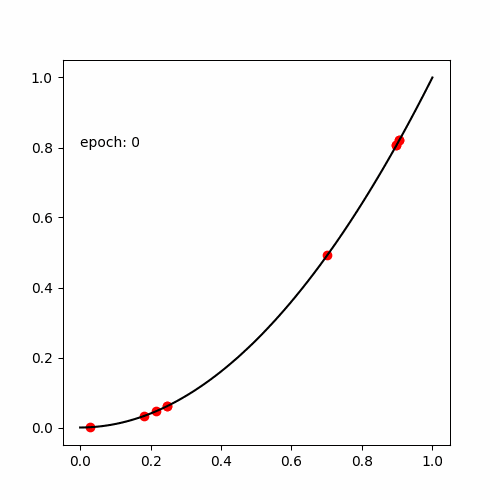
show_evolve_graph(gen_l,max_f,average_f)
def show_evolve_graph (gen_l,max_f,average_f):
plt.plot(gen_l, max_f, label = "MAX" )
plt.plot(gen_l, average_f,label = "AVERAGE" )
plt.ylim(0 ,1 )
plt.xlim(0 ,)
plt.title('FITNESS' )
plt.xlabel("EPOCH" )
plt.ylabel("VALUE" )
plt.legend()
plt.show()
def make_target_dataset ():
dataset = []
for x in range (-100 ,101 ,2 ):
x /= 100
dataset.append([x, target_func(x)])
return dataset
class GPTree :
def __init__ (self):
self.operator = None
self.left = None
self.right = None
def node_label (self):
if self.operator in FUNCTIONS :
return self.operator.__name__
return str (self.operator)
def print_tree (self, prefix = "" ):
print ("%s%s" % (prefix, self.node_label()) )
if self.left:
self.left.print_tree (prefix + " " )
if self.right:
self.right.print_tree(prefix + " " )
def draw_tree (self, fname, footer):
dot = [graphviz.Digraph(format ='svg' , filename=fname)]
dot[0 ].attr(kw='graph' , label = footer)
count = [0 ]
self.draw(dot, count)
dot[0 ].view()
def draw (self, dot, count):
node_name = str (count[0 ])
dot[0 ].node(node_name, self.node_label())
if self.left:
count[0 ] += 1
dot[0 ].edge(node_name, str (count[0 ]))
self.left.draw(dot, count)
if self.right:
count[0 ] += 1
dot[0 ].edge(node_name, str (count[0 ]))
self.right.draw(dot, count)
def compute_tree (self, x):
if self.operator in FUNCTIONS:
return self.operator( self.left.compute_tree(x),
self.right.compute_tree(x) )
elif self.operator == 'x' :
return x
else :
return self.operator
def random_tree (self, grow, max_depth, depth = 0 ):
if depth < MIN_DEPTH or (depth < max_depth and not grow):
self.operator = FUNCTIONS[random.randint(0 , len (FUNCTIONS)-1 )]
elif depth >= max_depth:
self.operator = TERMINALS[random.randint(0 , len (TERMINALS)-1 )]
else :
if random.random() > 0.5 :
self.operator = TERMINALS[random.randint(0 , len (TERMINALS)-1 )]
else :
self.operator = FUNCTIONS[random.randint(0 , len (FUNCTIONS)-1 )]
if self.operator in FUNCTIONS:
self.left = GPTree()
self.left.random_tree(grow, max_depth, depth = depth + 1 )
self.right = GPTree()
self.right.random_tree(grow, max_depth, depth = depth + 1 )
def mutation (self):
if random.random() < PROB_MUTATION:
self.random_tree(grow = True , max_depth = 2 )
return
if self.left:
self.left.mutation()
return
if self.right:
self.right.mutation()
def crossover (self, other):
if random.random() >= XO_RATE:
return
second = other.scan_tree([random.randint(1 , other.tree_size())], None )
self.scan_tree([random.randint(1 , self.tree_size())], second)
def scan_tree (self, count, second):
count[0 ] -= 1
if count[0 ] <= 1 :
if not second:
return self.build_subtree()
self.operator = second.operator
self.left = second.left
self.right = second.right
return None
if self.left and count[0 ] > 1 :
return self.left.scan_tree(count, second)
if self.right and count[0 ] > 1 :
return self.right.scan_tree(count, second)
def build_subtree (self):
t = GPTree()
t.operator = self.operator
if self.left:
t.left = self.left.build_subtree()
if self.right:
t.right = self.right.build_subtree()
return t
def tree_size (self):
if self.operator in TERMINALS: return 1
l = self.left.tree_size() if self.left else 0
r = self.right.tree_size() if self.right else 0
return 1 + l + r
def init_population (arg_pop_size, arg_max_depth):
pop = []
for md in range (3 , arg_max_depth + 1 ):
for i in range (int (arg_pop_size/6 )):
t = GPTree()
t.random_tree(grow = True , max_depth = md)
pop.append(t)
for i in range (int (arg_pop_size/6 )):
t = GPTree()
t.random_tree(grow = False , max_depth = md)
pop.append(t)
return pop
def fitness (individual, dataset):
errors = []
for ds in dataset:
errors.append( abs (individual.compute_tree(ds[0 ]) - ds[1 ] ) )
return 1 / ( mean(errors) +1 )
def selection (population, fitnesses):
tournament = []
tournament_fitnesses = []
for i in range (TOURNAMENT_SIZE):
pop_id = random.randint(0 , len (population)-1 )
tournament.append( pop_id )
tournament_fitnesses.append( fitnesses[pop_id] )
tmp_id = tournament_fitnesses.index( max (tournament_fitnesses) )
return deepcopy(population[tournament[tmp_id]])
if __name__ == '__main__' :
main()
↑こう書くと、↓こう表示されます
gen:249has f:0.855
0
mul
1
sub
0->1
10
add
0->10
2
mul
1->2
9
-1
1->9
3
mul
2->3
6
sub
2->6
4
x
3->4
5
x
3->5
7
2
6->7
8
x
6->8
11
x
10->11
12
1
10->12