end0tknr's kipple - web写経開発

太宰府天満宮の狛犬って、妙にカワイイ

パーセプトロン + python による単純な論理回路実装

GitHub - oreilly-japan/deep-learning-from-scratch: 『ゼロから作る Deep Learning』(O'Reilly Japan, 2016)

「ゼロから作るDeep Learning ① (Pythonで学ぶディープラーニングの理論と実装)」p.23 ~33の写経です。

# coding: utf-8
import numpy as np
import sys

def main():
    inputs = [(0, 0), (1, 0), (0, 1), (1, 1)]

    for gate in [[and_gate,    "AND"    ],
                 [not_and_gate,"NOT AND"],
                 [or_gate,     "OR"     ],
                 [xor_gate,    "XOR"    ]]:
        print( gate[1] )
        for xs in [(0, 0), (1, 0), (0, 1), (1, 1)]:
            y = gate[0](xs[0], xs[1])
            print( str(xs) + " -> " + str(y) )

# ANDゲート
# x1 x2│y
#───┼─
# 0  0 │0
# 1  0 │0
# 0  1 │0
# 1  1 │1
# 上記を満たす (x1,x2,w)は(0.5,0.5,0.8)や(1.0,1.0,1.0)等も
# ありますが、今回以下を使用
def and_gate(x1, x2):
    x = np.array([x1, x2])      # input
    w = np.array([0.5,0.5])     # weigth
    b = -0.7                    # bias
    tmp = np.sum(w*x) + b
    if tmp <= 0:
        return 0
    else:
        return 1

# NOT ANDゲート
# x1 x2│y
#───┼─
# 0  0 │1
# 1  0 │1
# 0  1 │1
# 1  1 │0
# 上記を満たす (x1,x2,w)は様々ありますが、今回以下を使用

# def not_and_gate(x1, x2):
#     return and_gate(x1, x2) * -1

def not_and_gate(x1, x2):
    x = np.array([x1,   x2])    # input
    w = np.array([-0.5, -0.5])  # weight
    b = 0.7                     # bias
    tmp = np.sum(w*x) + b
    if tmp <= 0:
        return 0
    else:
        return 1
    
# ORゲート
# x1 x2│y
#───┼─
# 0  0 │0
# 1  0 │1
# 0  1 │1
# 1  1 │1
# 上記を満たす (x1,x2,w)は様々ありますが、今回以下を使用

def or_gate(x1, x2):
    x = np.array([x1,  x2])     # input
    w = np.array([0.5, 0.5])    # weight
    b = -0.2                    # bias
    tmp = np.sum(w*x) + b
    if tmp <= 0:
        return 0
    else:
        return 1
    
# XORゲート
# x1 x2│y
#───┼─
# 0  0 │0
# 1  0 │1
# 0  1 │1
# 1  1 │0

# ★XORは、ANDやNAND、ORと異なり、
#    一つのパーセプトロンでは実現できない為、以下
def xor_gate(x1, x2):
    s1 = not_and_gate(x1, x2)
    s2 = or_gate(x1, x2)
    y  = and_gate(s1, s2)
    return y

if __name__ == '__main__':
    main()

↑こう書くと、↓こう表示されます

AND
(0, 0) -> 0
(1, 0) -> 0
(0, 1) -> 0
(1, 1) -> 1
NOT AND
(0, 0) -> 1
(1, 0) -> 1
(0, 1) -> 1
(1, 1) -> 0
OR
(0, 0) -> 0
(1, 0) -> 1
(0, 1) -> 1
(1, 1) -> 1
XOR
(0, 0) -> 0
(1, 0) -> 1
(0, 1) -> 1
(1, 1) -> 0
ニューラルネットワークにおける信号伝達の行列による計算

GitHub - oreilly-japan/deep-learning-from-scratch: 『ゼロから作る Deep Learning』(O'Reilly Japan, 2016)

「ゼロから作るDeep Learning ① (Pythonで学ぶディープラーニングの理論と実装)」p.60 の写経です。

ニューラルネットワーク

1 x 1 x 2 a (1) 2 a (1) 1 a (1) 3 b (1) 1 w (1) 11 w (1) 12 y y 1 2 w (1) 12 第1層の重み 次層の2番目ニューロン 前層の1番目ニューロン z (1) 2 z (1) 1 z (1) 3 h () h () h () σ ()

信号伝達の行列式

 \large{ \textbf{A}^{(1)} = \textbf{XW}^{(1)} + \textbf{B}^{(1)} }

ただし、A、X、W、Bは以下の通り

 \large{ \textbf{A}^{(1)} =
\begin{pmatrix}
  a^{(1)}_1 & a^{(1)}_2 & a^{(1)}_3
\end{pmatrix}
} \large{ \textbf{X}^{(1)} =
\begin{pmatrix}
  x_1 & x_2
\end{pmatrix}
}
 \large{ \textbf{B}^{(1)} =
\begin{pmatrix}
  b^{(1)}_1 & b^{(1)}_2 & b^{(1)}_3
\end{pmatrix}
} \large{ \textbf{W}^{(1)} =
\begin{pmatrix}
  w^{(1)}_{11} & w^{(1)}_{21} & w^{(1)}_{31} \\\
  w^{(1)}_{12} & w^{(1)}_{22} & w^{(1)}_{32}
\end{pmatrix}
}

活性化関数

活性化関数(  \large{ h() } )には、様々ありますが、 sigmoid関数とReLU関数の式とグラフは、以下の通り

sigmoid関数

 \Large{  h() = \frac{1}{ 1 + e^{-x}}  }

<sodipodi:namedview id="namedview7" pagecolor="#ffffff" bordercolor="#666666" borderopacity="1.0" inkscape:showpageshadow="2" inkscape:pageopacity="0.0" inkscape:pagecheckerboard="0" inkscape:deskcolor="#d1d1d1" inkscape:document-units="mm" showgrid="true" inkscape:zoom="2.8699528" inkscape:cx="91.987576" inkscape:cy="137.63293" inkscape:window-width="2560" inkscape:window-height="1351" inkscape:window-x="-9" inkscape:window-y="-9" inkscape:window-maximized="1" inkscape:current-layer="layer1"> <inkscape:grid type="xygrid" id="grid686" originx="0.66838312" originy="-0.44218888" /> </sodipodi:namedview> <inkscape:path-effect effect="bspline" id="path-effect2497" is_visible="true" lpeversion="1" weight="33.333333" steps="2" helper_size="0" apply_no_weight="true" apply_with_weight="true" only_selected="false" /> <inkscape:path-effect effect="bspline" id="path-effect2493" is_visible="true" lpeversion="1" weight="33.333333" steps="2" helper_size="0" apply_no_weight="true" apply_with_weight="true" only_selected="false" /> <inkscape:path-effect effect="bspline" id="path-effect1596" is_visible="true" lpeversion="1" weight="33.333333" steps="2" helper_size="0" apply_no_weight="true" apply_with_weight="true" only_selected="false" /> 0.5 1.0 O x h ()

ReLU関数 (ランプ関数)

 \large{  h() =
\begin{Bmatrix}
  x &amp; (x > 0) \\
  0 &amp; (x ≦ 0)
\end{Bmatrix}
}

<sodipodi:namedview id="namedview7" pagecolor="#ffffff" bordercolor="#666666" borderopacity="1.0" inkscape:showpageshadow="2" inkscape:pageopacity="0.0" inkscape:pagecheckerboard="0" inkscape:deskcolor="#d1d1d1" inkscape:document-units="mm" showgrid="true" inkscape:zoom="2.0293631" inkscape:cx="20.696149" inkscape:cy="58.639088" inkscape:window-width="2560" inkscape:window-height="1351" inkscape:window-x="-9" inkscape:window-y="-9" inkscape:window-maximized="1" inkscape:current-layer="layer1"> <inkscape:grid type="xygrid" id="grid686" originx="0.41218199" originy="-0.44218864" /> </sodipodi:namedview> <inkscape:path-effect effect="bspline" id="path-effect2497" is_visible="true" lpeversion="1" weight="33.333333" steps="2" helper_size="0" apply_no_weight="true" apply_with_weight="true" only_selected="false" /> <inkscape:path-effect effect="bspline" id="path-effect2493" is_visible="true" lpeversion="1" weight="33.333333" steps="2" helper_size="0" apply_no_weight="true" apply_with_weight="true" only_selected="false" /> <inkscape:path-effect effect="bspline" id="path-effect1596" is_visible="true" lpeversion="1" weight="33.333333" steps="2" helper_size="0" apply_no_weight="true" apply_with_weight="true" only_selected="false" /> 1.0 O x h () 1.0

ソフトマックス関数

再度に、出力層に使用する softmac関数である  \large{ σ() } は、以下の通り

ソフトマックス関数の特徴

出力値である 各 \large{y_i}は、0~1をとり、 その合計が、1となることから、確率に利用できます。

基本形

 \Large{
y_k = \frac { exp(a_k) }{ \sum^n_{i=1} exp(a_i)}
}

オーバーフロー対応型

基本形では、桁あふれの問題があるようですのが、 これを対策すると、以下のようになります。

 \large{ C' }は任意定数ですが、一般的には最大値を指定するようです。

 \Large{
y_k = \frac { exp(a_k) }{ \sum^n_{i=1} exp(a_i)}
= \frac { C exp(a_k) }{ C \sum^n_{i=1} exp(a_i)} \\\
= \frac { C exp(a_k + log C) }{ C \sum^n_{i=1} exp(a_i + logC )}
= \frac { C exp(a_k + C') }{ C \sum^n_{i=1} exp(a_i + C' )}
}

Re: Python3.6.10でDeepFloorPlanを動かしてみた

不動産住宅の間取り図の自動認識は、おもしろそうではありますが、 下記2の「We share all our annotations and train-test split file here.」から アノテーション他を取得できず、試すこともできず

古いエントリですので、さくじょされたんですよね。きっと

  1. Python3.6.10でDeepFloorPlanを動かしてみた - Qiita
  2. GitHub - c-makitahiroki/DeepFloorplan

sklearn for python で ランダムフォレスト

先程のentryで decision tree を使いましたので、 おまけで、ランダムフォレスト

#!/usr/local/bin/python3
# -*- coding: utf-8 -*-

from sklearn.datasets        import load_iris
from sklearn.model_selection import train_test_split
from sklearn.ensemble        import RandomForestClassifier
from sklearn.metrics         import accuracy_score

def main():
    iris_list = load_iris() # アヤメdataの読込み

    # 学習用dataと、test用dataに分割
    x_train, x_test, t_train, t_test = \
        train_test_split(
            iris_list.data,   # 説明変数(花びらのsizeや幅,長さ ※1)
            iris_list.target, # 目的変数(ヤメの種類            ※2)
            test_size=0.3,    # 3割をtest用に
            random_state=0 )
    
    # ランダムフォレストmodel作成
    model = RandomForestClassifier()
    # 学習
    model.fit(x_train, t_train)

    # test dataによる推測
    test = model.predict(x_test)
    # 推測結果の答え合わせ
    print( accuracy_score(t_test, test) )
    
if __name__ == '__main__':
    main()

参考url

sklearn for python で決定木を作成し、SVG出力

【機械学習】決定木をscikit-learnと数学の両方から理解する - Qiita

上記urlの写経 + 少々、修正です

目次

決定木作成とsvg出力を行うpython script

#!/usr/local/bin/python3
# -*- coding: utf-8 -*-

import pandas as pd
import numpy as np
from sklearn.tree import DecisionTreeClassifier, export_graphviz

import graphviz
import pydotplus

def main():
    data = pd.DataFrame({
        "buy"     :[1, 1, 1, 1, 1, 1, 1, 0, 0, 0, 0, 0, 0], # 買うor not
        "high"    :[4, 5, 3, 1, 6, 3, 4, 1, 2, 1, 1, 1, 3], # 階数
        "size"    :[30,45,32,20,35,40,38,20,18,20,22,24,25],# 部屋の広さ
        "autolock":[1, 0, 1, 1, 1, 1, 1, 0, 0, 0, 0, 1, 0]  # オートロック
    })

    # 目的変数
    y = data.loc[:,["buy"]]
    # 説明変数
    X = data.loc[:,["high", "size","autolock"]]

    # 決定木モデルの構築
    clf = DecisionTreeClassifier()
    clf = clf.fit(X, y)

    # SVG出力
    dot_data = export_graphviz(
        clf,
        out_file     =None,
        feature_names=["high", "size","autolock"],
        class_names  =["False","True"],
        filled =True,
        rounded=True,
        special_characters=True )

    graph = pydotplus.graph_from_dot_data(dot_data)
    graph.write_svg('tree.svg')

    # 予測 (おまけ、新規に2つのdataを追加し、予測)
    z = pd.DataFrame({ "high"    :[2, 3 ],
                       "size"    :[25,18],
                       "autolock":[1, 0 ] })
    z2 = z[["high", "size","autolock"]].values
    print( clf.predict(z2) )

if __name__ == '__main__':
    main()

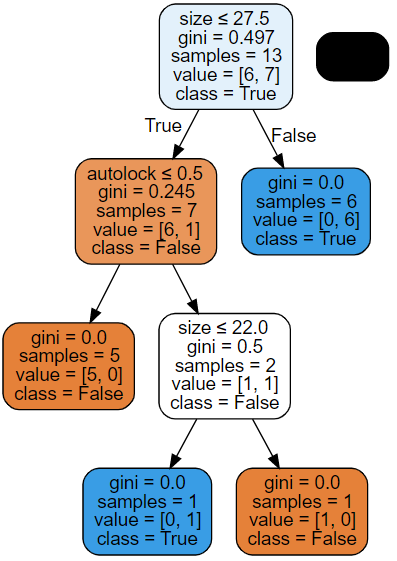
↑こう書くと、↓こう表示できます。

頂上nodeにある gini, samples, value, class の意味

各nodeにgini, samples, value, classが記載されていますので、 頂上nodeを例に説明します。

gini = 0.497

gini係数は 0~1の値で不純度を表し、均等になる程、0に近づきますが、 上記の「gini = 0.497」は次のように求められます。

 \large{
Gini = 1 - \sum_{i=1}^n p(i|t)^2
= 1 - { (\frac{6}{13})^2 + (\frac{7}{13})^2 } ≒ 0.497
}

samples = 13

このnodeで扱ったsample数です

value = [6,7]

export_graphviz()内の引数で class_names =["False","True"] と指定しましたので、 「size≦27.5」に対しての判定結果数が 「False, True」の順に表示されています。

class = True

末端nodeでないにも関わらず、 「class = True」と分類名が表示される理由はかっていません

当初、png出力を試みましたが

以下のエラーを解消できなかった為、pngは諦めました

[end0tknr@cent7 tmp]$ ./foo.py
Traceback (most recent call last):
  File "./foo.py", line 44, in <module>
    main()
  File "./foo.py", line 40, in main
    graph.write_png('tree.png')
  File "/usr/local/lib/python3.8/site-packages/pydotplus/graphviz.py", line 1810, in <lambda>
    prog=self.prog: self.write(path, format=f, prog=prog)
  File "/usr/local/lib/python3.8/site-packages/pydotplus/graphviz.py", line 1918, in write
    fobj.write(self.create(prog, format))
  File "/usr/local/lib/python3.8/site-packages/pydotplus/graphviz.py", line 2030, in create
    raise InvocationException(
pydotplus.graphviz.InvocationException: Program terminated with status: 1. stderr follows: Format: "png" not recognized. Use one of: canon cmap cmapx cmapx_np dot eps fig gv imap imap_np ismap pic plain plain-ext pov ps ps2 svg svgz tk vml vmlz xdot

国交省 国土地理院 による GEOコーディング & 逆GEOコーディング API

国土地理院APIでお手軽ジオコーディング&逆ジオコーディング - 芽萌丸

国交省 国土地理院のサイトには、 GEOコーディングAPIの資料が見つかりませんでしたが、 上記urlで見つけたのでメモ。

GoogleMap APIと比較すると、精度(情報粒度)は粗いようですが。

GEOコーディング

https://msearch.gsi.go.jp/address-search/AddressSearch?q=東京都渋谷区渋谷1

↑アクセス例と、↓その結果

[
  {"geometry"  : {"coordinates": [139.704285,35.661812],
   "type"      : "Point" },
   "type"      : "Feature",
   "properties": {"addressCode": "",
                  "title": "東京都渋谷区渋谷一丁目" } }
]

逆GEOコーディング

https://mreversegeocoder.gsi.go.jp/reverse-geocoder/LonLatToAddress?lat=35.661812&lon=139.704285

↑アクセス例と、↓その結果

{ "results":{"muniCd":"13113","lv01Nm":"渋谷一丁目"} }

住所コード( muniCd )→住所変換

上記の逆GEOコーディングにある住所コード( muniCd )は、 https://maps.gsi.go.jp/js/muni.js にあるマスターで変換できます。

例えば、先程の「"muniCd":"13113"」は 「GSI.MUNI_ARRAY["13113"] = '13,東京都,13113,渋谷区';」 と定義されています。

以下は、muni.js の抜粋です。

/************************************************************************
 設定:旧地理院地図より
 ************************************************************************/
GSI.MUNI_ARRAY = {};
GSI.MUNI_ARRAY["1100"] = '1,北海道,1100,札幌市';
GSI.MUNI_ARRAY["1101"] = '1,北海道,1101,札幌市 中央区';
GSI.MUNI_ARRAY["1102"] = '1,北海道,1102,札幌市 北区';
GSI.MUNI_ARRAY["1103"] = '1,北海道,1103,札幌市 東区';
GSI.MUNI_ARRAY["1104"] = '1,北海道,1104,札幌市 白石区';
GSI.MUNI_ARRAY["1105"] = '1,北海道,1105,札幌市 豊平区';
GSI.MUNI_ARRAY["1106"] = '1,北海道,1106,札幌市 南区';
GSI.MUNI_ARRAY["1107"] = '1,北海道,1107,札幌市 西区';
GSI.MUNI_ARRAY["1108"] = '1,北海道,1108,札幌市 厚別区';
GSI.MUNI_ARRAY["1109"] = '1,北海道,1109,札幌市 手稲区';
GSI.MUNI_ARRAY["1110"] = '1,北海道,1110,札幌市 清田区';
GSI.MUNI_ARRAY["1202"] = '1,北海道,1202,函館市';

重回帰分析に対してのロジスティック回帰

重回帰分析は量的なものの予測に利用される為、 次の回帰式で表されます。

 \Large{ y= a_0 + a_1x_1  + … + a_mx_m }

ロジスティック回帰の回帰式は、上記に似ていますが、 合格/不合格のような2値の確率予想に使用される為、 次の回帰式で表されます。

 \Large{
確率 : P = \frac{ 1 }{ 1 + exp(-(a_0 + a_1x_1  + … + a_mx_m))} }
P 1.0 0.0

重回帰分析における回帰係数の導出

先程のentryの重回帰分析版です。

回帰式

単回帰も重回帰も同様の手順で、回帰係数を導出できますが、 変数が多いと、手計算が手間ですので、 今回は以下の回帰係数を算出します。

 \Large{ y= a_0 + a_1x_1  + a_2x_2 }

偏微分連立方程式による  \large{ a_0 ,a_1 ,a_2 } の導出

 \Large{ L = \sum_{i=1}^n {(y - (a_0 + a_1x_{1i} + a_2x_{2i}))}^2 }

上記を  \large{ a_0 ,a_1 ,a_2 } のそれぞれで偏微分します

 
  \large{ \frac{\partial L}{\partial a_0} } = 
  -2 \sum_{i=1}^n \quad {(y - (a_0 + a_1x_{1i} + a_2x_{2i}))} = 0 …(式0)

  \large{ \frac{\partial L}{\partial a_1} } = 
  -2 \sum_{i=1}^n x_{1i} {(y - (a_0 + a_1x_{1i} + a_2x_{2i}))} = 0 …(式1)

  \large{ \frac{\partial L}{\partial a_m} } = 
  -2 \sum_{i=1}^n x_{2i} {(y - (a_0 + a_1x_{1i} + a_2x_{2i}))} = 0 …(式2)

式0の  \large{ a_0 } を式1、2へ代入する為、変形します。

 \large{
na_0 = \sum_{i=1}^n y_i - \sum_{i=1}^n a_1x_{1i} -\sum_{i=1}^n a_2x_{2i} }
 \large{
a_0 = \frac{\sum_{i=1}^n y_i}{n} -
      \frac{\sum_{i=1}^n a_1x_{1i}}{n} -
      \frac{\sum_{i=1}^n a_2x_{2i}}{n} }
 \large{
a_0 = \overline{y} - a_1 \overline{x_1} - a_2 \overline{x_2} …(式02)
}

式02を 式1、2へ代入し、変形します。

 \large{
a_1 \sum_{i=1}^n (x_{1i} - \overline{x_1})^2 - 
a_2 \sum_{i=1}^n (x_{1i} - \overline{x_1})(x_{2i} - \overline{x_2}) \\\
= \sum_{i=1}^n (x_{1i} - \overline{x_1})(y_i - \overline{y})
…(式12) }
 \large{
a_1 \sum_{i=1}^n (x_{1i} - \overline{x_1})(x_{2i} - \overline{x_2}) - 
a_2 \sum_{i=1}^n (x_{2i} - \overline{x_2})^2 \\\
= \sum_{i=1}^n (x_{2i} - \overline{x_2})(y_i - \overline{y})
…(式22) }

式12と式22を連立方程式として解くと、 回帰係数の  \large{ a_1 ,a_2 } は次のようになります。

 \large{
a_1 = \frac{ S_{1x}S_{22} - S_{2x}S_{12} }
           { S_{11}S_{22} - (S_{12})^2 }
 }
 \large{
a_2 = \frac{ S_{2x}S_{11} - S_{1x}S_{12} }
           { S_{11}S_{22} - (S_{12})^2 }
 }

ただし、上記にある  \large{ S_{11} } 等は以下の通りです

 \large{
S_{11} = \sum_{i=1}^n (x_{1i})^2 - n \overline{x_1}^2 }
 \large{
S_{22} = \sum_{i=1}^n (x_{2i})^2 - n \overline{x_2}^2 }
 \large{
S_{22} = \sum_{i=1}^n x_{1i}x_{2i} - n \overline{x_1}\overline{x_2} }
 \large{
S_{1x} = \sum_{i=1}^n x_{1i}x_{yi} - n \overline{x_1}\overline{y} }
 \large{
S_{2x} = \sum_{i=1}^n x_{2i}x_{yi} - n \overline{x_2}\overline{y} }

最小二乗法(単回帰分析)における回帰係数の導出

最小二乗法と、共分散/分散の関係をすっかり忘れていたので、振り返り

目次

最小二乗法 とは

回帰式を \Large{ f(x) }、実測値を \Large{ y }とするとき

 \Large{ \sum \{ y_i - f(x_i) \}^2 }  の 残差平方和(誤差)が最小の  f(x) を求めること

回帰式と回帰係数

回帰式が  \Large{ y=ax+b } の一時式となる場合、  \Large{ a 、b }は次のようになる


\Large{ a = \frac{ 共分散xy }{ 分散x } =
\frac{ \sum (x_i - \overline{x} ) (y_i - \overline{y} ) }{ \sum {(x_i - \overline{x})}^2 }
}

 \Large{ b = \overline{y} - a \overline{x} }

偏微分連立方程式による  a 、bの導出

 \Large{ \sum {(y - ax - b)}^2 }
 \Large{ = a^2 \sum{x^2} + n {b^2} + \sum {y^2}
-2a \sum{xy} -2b \sum{y} +2ab \sum {x}
}

上記を  a 、bのそれぞれで偏微分すると以下

 \Large{ 2a \sum{x^2} -2 \sum{xy} +2b \sum {x} = 0 }
 \Large{ 2nb -2 \sum{y} +2a \sum {x} = 0 }

上記2式の連立方程式を解くと、先程の共分散、分散、平均による  \Large{ a 、b }となります

x y O 回帰式:y=ax+b 誤差 実測値 誤差 実測値 誤差 実測値

labelImg for python3 and windows による YOLO用タグ作成

YOLOによる画像認識を行う為の準備メモ

https://github.com/heartexlabs/labelImg

install labelImg for python3 and windows

labelImgはGUI付のツールですので、 pip3.exe install labelImg により、PyQt5 もinstallされます。

PowerShell> cd C:\Users\end0t\tmp\python38\Scripts
PowerShell> pip3.exe install labelImg
PowerShell> pip3.exe list
  :
labelImg              1.8.6
  :
PyQt5                 5.15.7
PyQt5-Qt5             5.15.2
PyQt5-sip             12.11.0

labelImg の起動 と、利用の準備

c:/Users/end0t/tmp/python38/Scripts/labelImg.exe

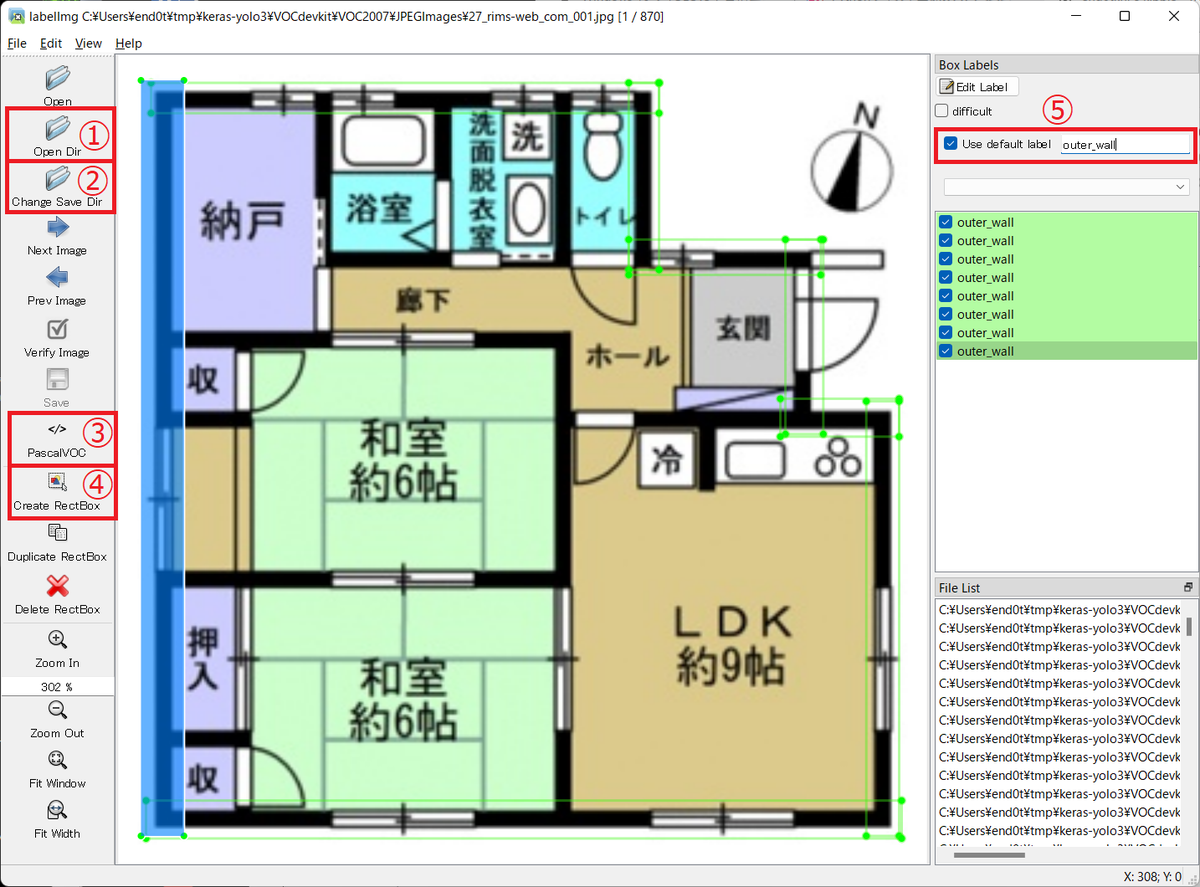
↑上記の labelImg.exe を実行すると、以下のような画面が表示されます。

No 説明
画像ファイルの読み込みdir.※1
アノテーションファイルの書込みdir. ※1
アノテーションファイルの形式.※1
アノテーション矩形の作成
アノテーション矩形の作成語、即タグが設定

※1 私の場合、https://github.com/qqwweee/keras-yolo3 用のタグ付けを 行いましたが、①~③はそれぞれ次のように設定しました。

No 説明
C:\Users\end0t\tmp\keras-yolo3\VOCdevkit\VOC2007\JPEGImages
C:\Users\end0t\tmp\keras-yolo3\VOCdevkit\VOC2007\Annotations
PascalVOC

labelImg ショートカット

short cur 説明
Ctrl + u フォルダからすべての画像をロード
Ctrl + r デフォルトのアノテーションターゲットdir変更
Ctrl + s 保存
Ctrl + d 現在のラベルと四角形のボックスをコピー
Ctrl + Shift + d 現在の画像を削除
Space 現在の画像に確認済みのフラグを付加
w 矩形を作成
d 次の画像
a 前の画像
del 選択した矩形を削除
Ctrl++ ズームイン
Ctrl-- ズームアウト
↑→↓← 選択した矩形を移動

Pillow for python による画像downloadと png形式での保存

先程のentryの続きです。

  • step 1 request.urlopen() で画像をdownloadし
  • step 2 io.BytesIO()で file化し
  • step 3 Pillow にて png形式で保存

します

#!/usr/local/bin/python3
# -*- coding: utf-8 -*-

from PIL import Image
from urllib import request
import io
import re
import sys

def main():

    urls_file_path = sys.argv[1]
    re_compile = re.compile("https?://([^/]+)")

    img_hosts = {}
    with open(urls_file_path) as f:
        for url in f.readlines():
            url = url.strip()

            re_result = re_compile.search( url )
            if not re_result:
                continue

            hostname = re_result.group(1).replace('.','_')
            if not hostname in img_hosts:
                img_hosts[hostname] = 0

            img_hosts[hostname] += 1
            save_file_path = "./img/%s_%03d.png" % (hostname,img_hosts[hostname])

            try:
                img_content = request.urlopen(url).read()
            except Exception as e:
                print(e, file=sys.stderr)
                continue
            
            with io.BytesIO( img_content ) as f:
                try:
                    img = Image.open(f)
                except Exception as e:
                    print(e, file=sys.stderr)
                    continue
                
                img.save( save_file_path)

if __name__ == '__main__':
    main()

selenium for python3 による google画像検索結果からの画像url抽出

以下の通りかと思います

#!/usr/local/bin/python3
# -*- coding: utf-8 -*-

from selenium import webdriver # ex. pip install selenium==4.0.0a7
from selenium.webdriver.chrome.options import Options
from selenium.webdriver.chrome.service import Service
from selenium.webdriver.common.by      import By
from selenium.webdriver.support.ui     import Select
import re
import sys
import time
import urllib.parse

conf = {
    "selenium" : {
        "browser_driver": "./chromedriver",
#        "browser_driver": "/usr/local/bin/chromedriver",
        "browser_options" : [
#            "--headless",
            "--enable-logging=False",
            "--ignore-certificate-errors",
            "--disable-extensions",
            "--disable-print-preview",
            "--download.default_directory=/tmp"
        ],
        "implicitly_wait": 10 }
}

search_url = "https://www.google.co.jp/search"
search_str = urllib.parse.quote("戸建て住宅 間取り図面")
search_params = [
    "q="  + search_str,
    "tbm=isch",
    "hl=ja",
    "sclient=img",
    "ei=7yL2Ypn2MtuM1e8PutqksA0",
    "tbs=itp:clipart",
    "sa=X"]
re_compile = re.compile("\?imgurl=(.[^&]+)")
# 収集する最大url数.
# google検索での最大件数がこの程度でしたので
max_url_size = 900


def main():
    browser = get_browser()

    req_url = search_url +"?" + "&".join(search_params)
    print( req_url )
    browser.get( req_url )
    time.sleep(3)
    
    img_urls = []
    while len(img_urls) <= max_url_size:
        print( len(img_urls), file=sys.stderr )
        img_urls = extract_img_urls( browser, img_urls )
        
    for img_url in img_urls:
        print( img_url )
        

def extract_img_urls( browser, img_urls ):
    a_elms = browser.find_elements(by=By.CSS_SELECTOR,
                                   value="a.wXeWr")
    i = len( img_urls )
    while i < len( a_elms ):
        a_elm = a_elms[i]
        
        try:
            # clickすることで、auto pagerize します
            a_elm.click()
            href_url =  a_elm.get_attribute("href")
        except Exception as e:
            i += 1
            time.sleep( 1 )
            continue
        
        re_result = re_compile.search( href_url )
        
        if not re_result:
            i += 1
            continue
        
        img_url = re_result.group(1)
        img_url = urllib.parse.unquote( img_url )
        img_urls.append( img_url )
        
        i += 1
        time.sleep( 1 )
        
    return img_urls

# selenium を使用する場合、browser(driver)を返します
def get_browser():
    selenium_conf = conf["selenium"]
    browser_service = \
        Service( executable_path=selenium_conf["browser_driver"] )

    browser_opts = Options()
    for tmp_opt in selenium_conf["browser_options"]:
        browser_opts.add_argument( tmp_opt )

    browser = webdriver.Edge(service = browser_service,
                             options = browser_opts )
    # 要素が見つかるまで、最大 ?秒 待つ
    browser.implicitly_wait( selenium_conf["implicitly_wait"] )

    # 以下は、headless modeでもdownloadする為のもの。
    # refer to https://qiita.com/memakura/items/f80d2e2c59514cfc14c9
    browser.command_executor._commands["send_command"] = (
        "POST",
        '/session/$sessionId/chromium/send_command' )
    params = {'cmd': 'Page.setDownloadBehavior',
              'params': {'behavior': 'allow',
                         'downloadPath': '/tmp' } }
    browser.execute("send_command", params=params)

    return browser


if __name__ == '__main__':
    main()

unityの OnTriggerEnter()による当たり判定

unityには、先程の OnCollisionEnter()とは 別のOnTriggerEnter()があるらしい。

先程の OnCollisionEnter() では、Rigidbodyどうしの衝突を判定できましたが OnTriggerEnter()では、衝突することなく、通過?を判定できるみたい。

以下では、3D Sphereをカーソルキーで動かし、 他の 3D Sphere と衝突?した場合、他の 3D Sphere の色を変更します。

Step 1 - 手玉となる 赤色 3D Sphere 追加

先程のentryと全く同様、「Add Component」から「Rigidbody」を追加します。

Step 2 - 的玉となる 白色 3D Sphere 追加

的玉と判定する為「Others」というタグを設定ますが、「Rigidbody」は追加しません。

代わりに、Sphere Colliderの「Is Trigger」を ONにします。

Step 3 - c# script作成

using System.Collections;
using System.Collections.Generic;
using UnityEngine;

public class NewBehaviourScript : MonoBehaviour {
    bool f = true;
    Vector3 cv = new Vector3(0f, 1f, -5f);
    Rigidbody rb = null;

    void Start(){
        rb = GetComponent<Rigidbody>();
    }

    void Update(){
        var sv = transform.position;
        sv.y = 1f;
        Camera.main.transform.position = sv + cv;

        var x = Input.GetAxis("Horizontal");
        var y = Input.GetAxis("Vertical");
        var v = new Vector3(x, 0, y);

        rb.AddForce(v);
    }

    void OnTriggerEnter(Collider collider){
        if (collider.gameObject.tag == "Other"){
       //色を変更します
            var r = collider.gameObject.GetComponent<Renderer>();
            r.material.color = new Color(0f, 0f, 0f, 0.25f);
            r.material.SetFloat("_Metallic", 0f);
        }
    }
}

unityの OnCollisionEnter()による当たり判定

3D Sphereをカーソルキーで動かし、 他の 3D Sphere と衝突した場合、他の 3D Sphere を消去します。

Step 1 - 手玉となる 赤色 3D Sphere 追加

以下のように「Add Component」から「Rigidbody」を追加します。 尚、3D Sphereへの赤色設定方法は先日のentryをご覧ください。

Step 2 - 的玉となる 白色 3D Sphere 追加

先程と同様「Rigidbody」付で3D Sphere を追加し、 更に的玉と判定する為「Others」というタグを設定ます。

Step 3 - c# script作成

using System.Collections;
using System.Collections.Generic;
using UnityEngine;

public class SampleSceneScript : MonoBehaviour {
    bool f = true;
    Vector3 cv = new Vector3(0f, 1f, -5f);
    Rigidbody rb = null;
    void Start(){
        rb = GetComponent<Rigidbody>();
    }

    void Update() {
        var sv = transform.position;
        sv.y = 1f;
        Camera.main.transform.position = sv + cv;
    //カーソルキーによる手玉の移動
        var x = Input.GetAxis("Horizontal");
        var y = Input.GetAxis("Vertical");
        var v = new Vector3(x, 0, y);

        rb.AddForce(v);
    }

    //衝突が発生した場合、「Others」を消去
    void OnCollisionEnter(Collision collision){
        if (collision.gameObject.tag == "Other"){
            GameObject.Destroy(collision.gameObject);
        }
    }
}

unityにおける3D Objectへの着色

目次

Step 1 - Project欄において、Assets以下に Folder作成

Step 2 - 作成したFolder以下に Material作成

Step 3 - Inspector欄において Materialに着色

Step 4 - Materialを 3D Sphereへドラッグし、適用